# Adding custom resource to Kubernetes
Besides the default resources such as Pod, ReplicaSet, Deployment, StatefulSet, ..., kubernetes allows us to create additional custom resources to meet our needs in the project, each custom resource will serve a specific purpose. some specific purpose in our project. For example, to create a postgres database in kubernetes, we will first define a StatefulSet, then create a Service for this StatefulSet so that clients can connect to it. We can reduce the process of having to create many related things like that by defining a custom resource named Postgres. Every time we need a postgres database, we just need to create a Postgres custom resource, for example as follows:
```yaml
...
kind: Postgres
metadata:
name: test-db
storage: 50GB
```
### Custom Controller
Before talking about custom resources, we will talk about how to create custom controllers first. In the article [Kubernetes internals architecture](https://viblo.asia/p/kubernetes-series-bai-11-kubernetes-internals-architecture-L4x5xPjb5BM) , we learn about the internal structure of kubernetes, it includes 4 main components: etcd, API server, Controller Manager, Scheduler. The Controller Manager is responsible for monitoring the API server and creating resources related to it. For example, the Deployment Controller will be responsible for monitoring the Deployment resource on the API server and creating related resources. In addition to the available Controller Managers inside kubernetes, we can create additional custom controllers to serve a different purpose.
In kubernetes, you will notice that when we create a ConfigMap and assign it to a Pod, when we update that ConfigMap with the new value, the Pod using our ConfigMap still retains the old value, if we want If the Pod uses the new ConfigMap value, we must delete that Pod and recreate it so it can update the new value. This job is a bit laborious, we can create a custom controller to do this job automatically, our customer controller will monitor the ConfigMap resource on the API server, and if it detects a change in the ConfigMap, it will automatically Delete that Pod and if the Pod is created with resources such as ReplicaSet, Deployment, it will be automatically recreated, at this point our new Pod will use the new value of ConfigMap.
To create a custom controller, first we will write code that will monitor the API server with the resources we want, then we will build it into an image, then we will create a Deployment that uses the image we just created and deploy it to kubernetes. In essence, a customer controller is just a normal Deployment guy, the difference is that we will write our own code to interact with the API server.
#### Create a customer controller
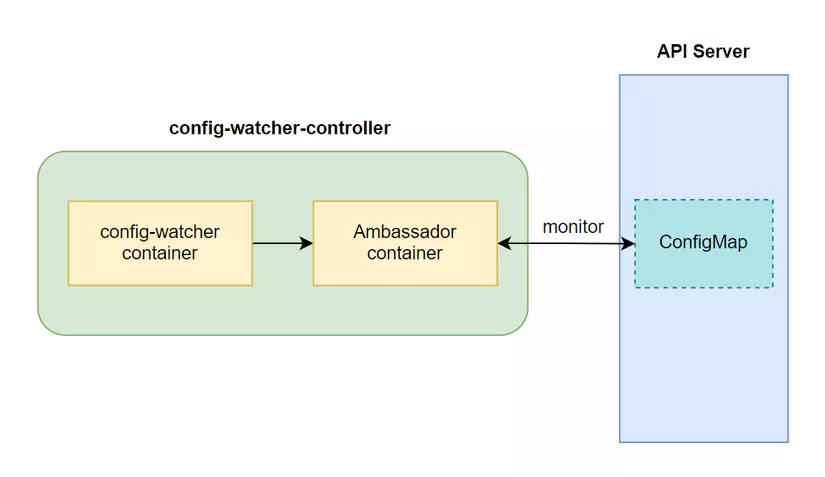
Now we will create a customer controller named config-watcher-controller, it will monitor ConfigMap and if any Pod uses the related ConfigMap, when ConfigMap changes, this new ConfigMap value will also be updated for the Pod. automatically. It will do this by deleting the old Pod so that the Pod can be recreated. An illustration of config-watcher-controller is as follows:
Now we will proceed to write the code and build the image for the config-watcher container, creating a file [config-watcher-controller.sh](http://config-watcher-controller.sh/) with the following code:
```bash
#!/bin/bash
# Controller script which watches configmaps and evaluates annotation
# on the ConfigMap for pods to restart
# Namespace to watch (or 'default' if not given)
namespace=${WATCH_NAMESPACE:-default}
# API URL setup. Requires an ambassador API proxy running side-by-side on localhost
base=http://localhost:8001
ns=namespaces/$namespace
# Main event loop
start_event_loop() {
# Watch the K8s API on events on service objects
echo "::: Starting to wait for events"
# Event loop listening for changes in config maps
curl -N -s $base/api/v1/${ns}/configmaps?watch=true | while read -r event
do
# Sanitize new lines
event=$(echo "$event" | tr '\r\n' ' ')
# Event type & name
local type=$(echo "$event" | jq -r .type)
local config_map=$(echo "$event" | jq -r .object.metadata.name)
# Fetch annotations of ConfigMap and extract our trigger annotation if any
# The extracted pod selector is expected to have
# the format "label1=value1,label2=value2,.."
local annotations=$(echo "$event" | jq -r '.object.metadata.annotations')
if [ "$annotations" != "null" ]; then
local pod_selector=$(echo $annotations | jq -r 'to_entries | .[] | select(.key == "k8spatterns.io/podDeleteSelector") | .value | @uri')
fi
echo "::: $type -- $config_map -- $pod_selector"
# Act only when configmap is modified and an annotation has been given
if [ $type = "MODIFIED" ] && [ -n "$pod_selector" ]; then
delete_pods_with_selector "$pod_selector"
fi
done
}
# Delete all pods that match a selector
delete_pods_with_selector() {
local selector=${1}
echo "::::: Deleting pods with $selector"
# Pick up all pod names which match the given selector
local pods=$(curl -s $base/api/v1/${ns}/pods?labelSelector=$selector | \
jq -r .items[].metadata.name)
# Delete all pods that matched
for pod in $pods; do
# Delete but also check exit code
exit_code=$(curl -s -X DELETE -o /dev/null -w "%{http_code}" $base/api/v1/${ns}/pods/$pod)
if [ $exit_code -eq 200 ]; then
echo "::::: Deleted pod $pod"
else
echo "::::: Error deleting pod $pod: $exit_code"
fi
done
}
# ==============================================
# Fire up
start_event_loop
```
We don't need to understand the detailed code, the above code will have the task of monitoring ConfigMap on the API server with the command `curl -N -s $base/api/v1/${ns}/configmaps?watch=true | while read -r event`, if ConfigMap changes anything, it will run to the code below, and detect if If any ConfigMap changes and a Pod uses it, it will delete that Pod with the code:
```bash
if [ $type = "MODIFIED" ] && [ -n "$pod_selector" ]; then
delete_pods_with_selector "$pod_selector"
fi
```
We just need to understand the action of the above code. Next, we create the Dockerfile:
```dockerfile
FROM alpine
WORKDIR /watcher
RUN apk add --update curl jq && rm -rf /var/cache/apk/*
COPY config-watcher-controller.sh .
ENTRYPOINT ["curl"]
```
Next, build and push the image to **your docker hub** if you don't want to use image **080196/configmap-watcher** :
```none
$ docker build . -t 080196/configmap-watcher
$ docker push 080196/configmap-watcher
```
After finishing, we create a file named config-watcher-controller.yaml with the following configuration:
```yaml
# Service account required for watching to resources
apiVersion: v1
kind: ServiceAccount
metadata:
name: config-watcher-controller
---
# Bind to 'edit' role to allow for watching resources and restarting pods
apiVersion: rbac.authorization.k8s.io/v1
kind: RoleBinding
metadata:
name: config-watcher-controller
subjects:
- kind: ServiceAccount
name: config-watcher-controller
roleRef:
name: edit
kind: ClusterRole
apiGroup: rbac.authorization.k8s.io
---
# Controller with kubeapi-proxy sidecar for easy access to the API server
apiVersion: apps/v1
kind: Deployment
metadata:
name: config-watcher-controller
spec:
replicas: 1
selector:
matchLabels:
app: config-watcher-controller
template:
metadata:
labels:
app: config-watcher-controller
spec:
# A serviceaccount is needed to watch events
# and to allow for restarting pods. For now its
# associated with the 'edit' role
serviceAccountName: config-watcher-controller
containers:
- name: proxy
image: 080196/kubeapi-proxy
- name: config-watcher
image: 080196/configmap-watcher
env:
# The operator watches the namespace in which the controller
# itself is installed (by using the Downward API)
- name: WATCH_NAMESPACE
valueFrom:
fieldRef:
fieldPath: metadata.namespace
command:
- "sh"
- "/watcher/config-watcher-controller.sh"
```
In the file above, we will create a separate ServiceAccount to use for our config-watcher-controller instead of using the default ServiceAccount, then we will use RoleBinding to bind the edit role to this ServiceAccount to allow it the right to edit functions. resource in a namespace. In the Deployment config, we will declare the above ServiceAccount in the Pod template, so that the container application in the Pod can edit kubernetes resources. You can review [lesson 13](https://viblo.asia/p/kubernetes-series-bai-13-serviceaccount-and-role-based-access-control-security-kubernetes-api-server-07LKXQD4ZV4) to better understand ServiceAccount. To let this controller know which namespace it is monitoring, we use [the Downward API](https://viblo.asia/p/kubernetes-series-bai-10-downward-api-truy-cap-pod-metadata-m68Z0eGdlkG) mentioned in lesson 11.
We create the above controller:
```none
$ kubectl apply -f config-watcher-controller.yaml
serviceaccount/config-watcher-controller created
rolebinding.rbac.authorization.k8s.io/config-watcher-controller created
deployment.apps/config-watcher-controller created
```
#### Use custom controllers
Ok, so we have created a custom controller, next we will create a resource and test it, to use config-watcher-controller, when we declare ConfigMap, we will add the annotations field with the value `k8spatterns.io/podDeleteSelector: "="` , with key value being the label of the Pod that we want to update the ConfigMap value for when our ConfigMap changes. Create a file named confimap-watch.yaml:
```yaml
apiVersion: v1
kind: ConfigMap
metadata:
name: webapp-config
annotations:
k8spatterns.io/podDeleteSelector: "app=webapp"
data:
message: "Hello configmap watch one"
```
```none
$ kubectl apply -f confimap-watch.yaml
configmap/webapp-config created
```
Create a file named deploy-use-configmap-watcher.yaml:
```yaml
apiVersion: apps/v1
kind: Deployment
metadata:
name: webapp
spec:
replicas: 1
selector:
matchLabels:
app: webapp
template:
metadata:
labels:
app: webapp
spec:
containers:
- name: webapp
image: alpine
command: ["/bin/sleep", "999999"]
envFrom:
- configMapRef:
name: webapp-config
```
The Pod's label value is the value we declared in the ConfiMap above. We create a Deployment and access it to see the previous ConfigMap value, then we will update the ConfigMap value again and see if our Pod is automatically updated with the value or not:
```none
$ kubectl apply -f deploy-use-configmap-watcher.yaml
deployment.apps/webapp created
$ kubectl get pod
NAME READY STATUS RESTARTS AGE
config-watcher-controller-547d6547c6-hqpl6 2/2 Running 0 5m59s
webapp-84f8f48c69-k8bb6 0/1 ContainerCreating 0 6s
$ kubectl exec -it webapp-84f8f48c69-k8bb6 -- sh
/ # env
...
message=Hello configmap watch one
...
/ # exit
```
Update the confimap-watch.yaml file:
```yaml
apiVersion: v1
kind: ConfigMap
metadata:
name: webapp-config
annotations:
k8spatterns.io/podDeleteSelector: "app=webapp"
data:
message: "Hello configmap watch two"
```
```none
$ kubectl apply -f confimap-watch.yaml
configmap/webapp-config configured
```
Now if we get pod, we will see that one is being deleted and another is being created:
```none
$ kubectl get pod
NAME READY STATUS RESTARTS AGE
config-watcher-controller-547d6547c6-hqpl6 2/2 Running 0 10m
webapp-84f8f48c69-k8bb6 1/1 Terminating 0 5m6s
webapp-84f8f48c69-r28lw 1/1 Running 0 14s
```
When we access the new pod and check again, we will see that our env has been updated:
```none
$ kubectl exec -it webapp-84f8f48c69-r28lw -- sh
/ # env
...
message=Hello configmap watch two
...
```
Ok, so our custom controller is running correctly 😄. At this point, we know how to write and create a customer controller to serve our specific purpose, but before we do anything, we should see if anyone has done it before. If so, we can use it. Just for use, because writing a controller that can run in a production environment requires many more tests, the code above is only for the dev environment.
### Custom Resource
After we talked about custom controllers, now we will talk about custom resources. To create a custom resource, we will use **CustomResourceDefinition** , we will write CustomResourceDefinition and define our custom resource values in it. Then we will create this CustomResourceDefinition, then we will write a controller to monitor our newly created custom resource and perform actions related to it. For example, we have a website-crd.yaml file with the CustomResourceDefinition config as follows:
```yaml
apiVersion: apiextensions.k8s.io/v1
kind: CustomResourceDefinition
metadata:
name: websites.extensions.example.com # The full name of your custom object
spec:
scope: Namespaced # You want Website resources to be namespaced.
group: extensions.example.com # Define an API group and version of the Website resource.
versions:
- name: v1
served: true
storage: true
schema:
openAPIV3Schema:
type: object
properties:
spec:
type: object
properties:
gitRepo:
type: string
names: # You need to specify the various forms of the custom object’s name.
kind: Website
singular: website
plural: websites
```
In the file above, the group and version fields will define the API group and version of this resource on the API server. The values of those two fields above are `extensions.example.com`and `v1`, so when we declare the resource, the apiVersion we will specify is `extensions.example.com/v1`, In the **names** field , we will define kind and two verbs, singular and plural, of the custom resource. With the above value, we will execute the command `kubectl get website`to list all Website resources. We create CustomResourceDefinition above:
```none
$ kubectl apply -f website-crd.yaml
customresourcedefinition.apiextensions.k8s.io/websites.extensions.example.com created
```
Now we have defined our custom resource on the API server. To create this resource, we create a file called website.yaml with the following configuration:
```yaml
apiVersion: extensions.example.com/v1
kind: Website
metadata:
name: kubia
spec:
gitRepo: https://github.com/luksa/kubia-website-example.git
```
```none
$ kubectl apply -f website.yaml
website.extensions.example.com/kubia created
```
Ok, so we have a custom resource. To interact with it, we also use interaction commands like other normal resources:
```none
$ kubectl get website
NAME AGE
kubia 71s
$ kubectl delete website kubia
website.extensions.example.com "kubia" deleted
```
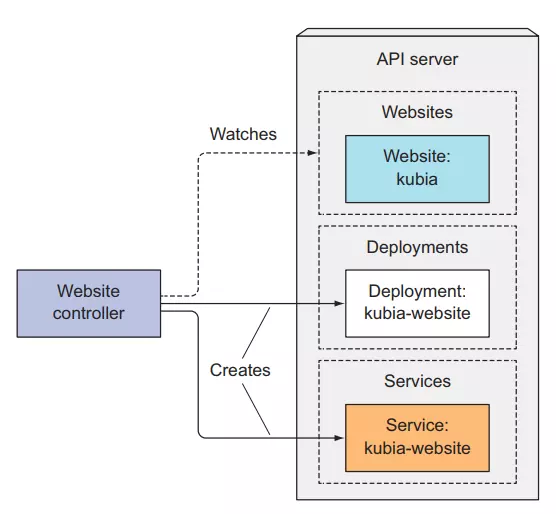
So our custom resource has run successfully, but it will not take any action. In order for this resource to be actually used, we need to create a controller for it. We will want our Website resource to act as follows, we will define the Website resource with the path to gitlab of the static website we need to deploy, then we will create the Website resource, our controller will monitor and detect the presence of the Website resource. newly created, it will create a resource Deployment to deploy the Pod that runs the static website, then it will create a service that exposes website traffic to the client.
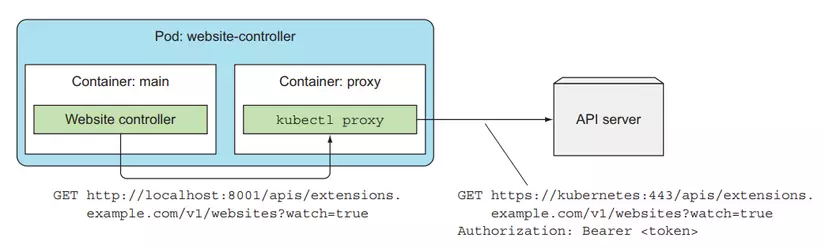
We create a controller website-controller.yaml with the following configuration:
```yaml
apiVersion: apps/v1
kind: Deployment
metadata:
name: website-controller
spec:
replicas: 1
selector:
matchLabels:
app: website-controller
template:
metadata:
name: website-controller
labels:
app: website-controller
spec:
serviceAccountName: website-controller
containers:
- name: main
image: luksa/website-controller
- name: proxy
image: luksa/kubectl-proxy:1.6.2
```
```none
$ kubectl create serviceaccount website-controller
serviceaccount/website-controller created
$ kubectl create clusterrolebinding website-controller --clusterrole=cluster-admin --serviceaccount=default:website-controller
clusterrolebinding.rbac.authorization.k8s.io/website-controller created
$ kubectl apply -f website-controller.yaml
deployment.apps/website-controller created
```
The operation of the website-controller container is similar to the configmap watch controller we wrote above.
If you want to see the code, look at this github repo . Now we will create the Website resource again to see it in action:
```none
$ kubectl apply -f website.yaml
website.extensions.example.com/kubia created
$ kubectl get website
NAME AGE
kubia 15s
$ kubectl get deploy,svc,po
NAME DESIRED CURRENT UP-TO-DATE AVAILABLE AGE
deploy/kubia-website 1 1 1 1 4s
deploy/website-controller 1 1 1 1 5m
NAME CLUSTER-IP EXTERNAL-IP PORT(S) AGE
svc/kubernetes 10.96.0.1 443/TCP 38d
svc/kubia-website 10.101.48.23 80:32589/TCP 4s
NAME READY STATUS RESTARTS AGE
po/kubia-website-1029415133-rs715 2/2 Running 0 4s
po/website-controller-1571685839-qzmg6 2/2 Running 1 5m
```
Ok, so our custom resource and controller are working correctly. Instead of having to create Deployment and Service separately, we just need to define a CRD. Although doing this at first is difficult, later on, our work will be much easier
---
# Agent Instructions: Querying This Documentation
If you need additional information that is not directly available in this page, you can query the documentation dynamically by asking a question.
Perform an HTTP GET request on the current page URL with the `ask` query parameter:
```
GET https://huy312100.gitbook.io/software-development/devops/kubernetes/adding-custom-resource-to-kubernetes.md?ask=
```
The question should be specific, self-contained, and written in natural language.
The response will contain a direct answer to the question and relevant excerpts and sources from the documentation.
Use this mechanism when the answer is not explicitly present in the current page, you need clarification or additional context, or you want to retrieve related documentation sections.