Network
If you have a question, why the heck do we need to secure cluster nodes? Isn't it true that when we run a container, the environment inside a container will be completely separate from our external server? How can a container access the woker node and we need to secure it?
To answer this question, kubernetes does allow us to configure a container to be able to access outside the server node. Why does that have to be because there will be some cases where we need our container to have access rights? Only when we go outside the server can our application run. For example, an application needs to monitor the entire network of the node. If we do not have access to the outside of the node, how can we monitor it? But we only want the Pod containers we allow to be accessible outside the node. Not all Pod containers can be accessed, so we need a way to secure the cluster nodes and network. If there is a container that we don't want, it cannot be accessed outside the node.
First we will talk about how to configure the container so it can access the server node and network, then we will talk about security.
Access the server node's host network from within the Pod's container
To understand how a container inside a Pod will access the node's host network, we will first look at how a container's network will be organized. Depending on the tool we use to run the container, it will be different, but the architecture will be similar. Here we will talk about docker's container network.
Docker container networking
Each container will have its own loopback interface and private Ethernet interface. An Ethernet interface is a connection point used to connect to an external Ethernet interface or network, so that a container can go out to the internet through it. Loopback interface is a virtual interface, allowing applications inside the container to talk to each other using http protocol through localhost, this is why when inside a container, but if you use localhost inside The container to connect to an application installed outside the server does not run , because this loopback interface is only located in the container.

The network of a container will be organized in 4 forms as follows:
Closed containers
Bridged containers
Joined containers
Open containers

Closed containers
This type of container network will not allow any traffic to access it, including applications from within it accessing the internet. All applications in this container can only talk to each other through the loopback interface, not to the outside world.

Bridged containers
In this form of container network, applications inside the container can talk to the outside internet through an Ethernet interface.
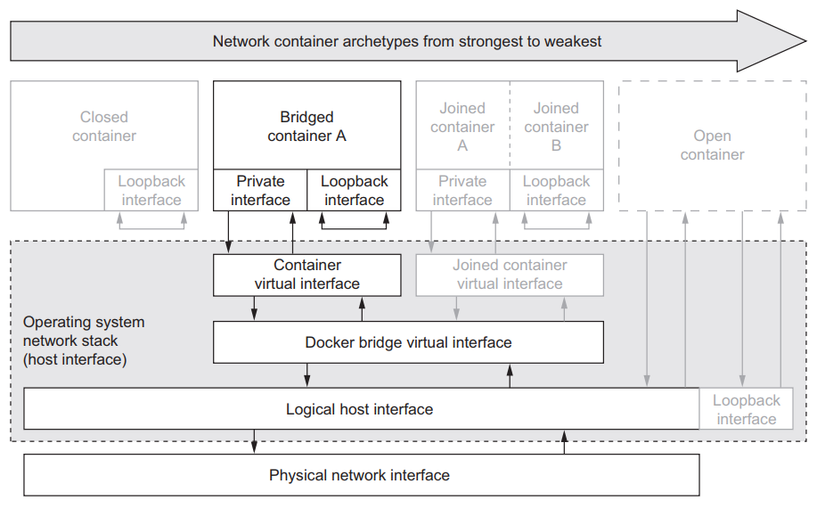
Open containers
And in the final form of container network, it is completely open, it will not have its own loopback interface and private Ethernet interface, this is the type of container that completely uses the host network of the server node. If you are in this container network form, you can use localhost to connect to the application on the normal server node.

Access host network from Pod
So kubernetes allows us to configure the Pod so that the container inside it can use the worker node's hostnetwork. We use the hostNetwork property and set it to true. For example, create the file pod-with-host-network.yaml:
When we create the pod and access the container, type ifconfig we will see that the container is now using the node's host network.
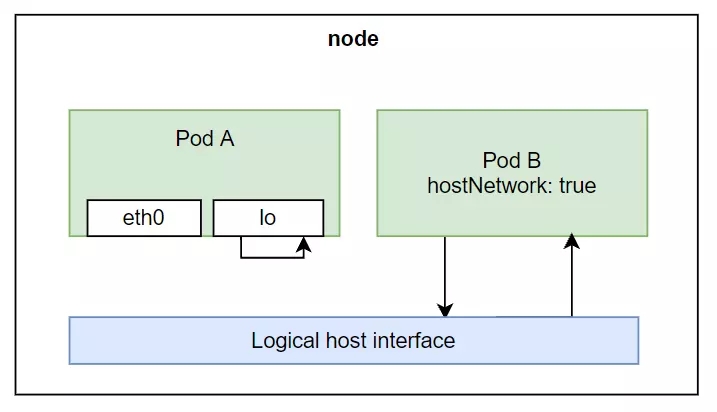
Containers in Pods can now use localhost to access applications outside of node.
Access node's PID and IPC
Similar to hostNetwork, we will have two attributes: hostPID and hostIPC so that the container inside the Pod can access the PID and IPC of the node. When we do that, the application inside the container can see the applications running on our worker node, and can also talk to those applications via IPC (Inter-process communication). This means that if we run the container with the above two properties, when we list processes inside the container, we can see all the PIDs of other processes on the worker node. For example, create the config file pod-with-host-pid-and-ipc.yaml as follows:
Use container's security context
Besides some properties for the container to access the server node. Then kubernetes provides us with the securityContext attribute , allowing us to configure some container properties as follows:
Specify the userid and groupid for the container.
Prevent containers from running with root user.
Run the container in privileged mode, allowing the container to have full rights to the node's kernel.
Configure fine-grained privileges.
Block processes that can write to the container's filesystem.
...
Specify the user when running the container
When we run a container, by default it will run with the root user inside the container, meaning when we access the container, we can create files or delete files and do anything that the root user can do inside. container.
We will see uid=0(root) gid=0(root) groups=0(root), their container is running as root user. Then we can specify a non-root user when running the container, using the securityContext.runAsUser property . For example:
In the file above, we specify the attribute 1000. When we create the pod and run the user id command again, we will see that now our user is not root anymore.
If we run it like that, now when we access the container, we will not have the right to create files or delete any files but are located in folders that only root has rights to.
Prevent containers from running as root user
If we are not sure which user we want to assign to the container, because we pulled the container from the internet and did not build it ourselves, but as long as it does not have to run as root, then we can use the runAsNonRoot property . . For example:
Run Pod with privileged mode
There will be cases where we need the container inside the Pod to have enough access to the server node. An easy to understand example is the kube-proxy pod we talked about in the article Kubernetes internals architecture , it needs to have enough permissions to be able to modify the iptables rule. To grant the container enough rights, we use the privileged attribute . For example, create the pod-privileged.yaml file:
Now the container guy has enough rights to perform actions on the worker node. To understand better, let's create a Pod and compare it with the pod-with-defaults guy we created above.
We will see it displays a number of devices, but very few, now let's try the list inside pod-privileged.
Now we will see more devices displayed. Because the container guy with privileged mode has the right to see all devices of the server node.
Add individual kernel capabilities for containers
As you can see above, privileged mode will give the container full rights, but there will be cases where we do not want it to have full rights, but only some rights, then we can use the capabilities attribute . For example, our pod-with-defaults guy will not have permission to change the execution of the date command.
For the pod to be able to execute the date command, we need to add permissions to it. For example:
We can just add or drop the capabilities attribute . In the config above, we only add properties. When we create and access the pod to execute the date statement, we will see that it can now be done.
Block processes that can write to the container's filesystem
There will be cases where we need to block a process inside the container that can write to the container's filesystem, for example, we run a nodejs application, have a payment gateway configuration, we read from the file inside the container, if someone can access it. our container, edit this payment gateway config file to their information, now our money will go through them. To prevent this, we will use the readOnlyRootFilesystem property . For example:
We can see that a container guy can use many ways to access our server node, developers with access to our cluster can also create containers with the permissions they want, sometimes they don't understand much. Regarding security, they only know that if they add that attribute, the application will run, so they just add it. Then, as a cluster administrator, you can prevent developers from being able to create Pods with the permissions they assign in the Pod.
SubSecurityPolicy
This is a cluster resource, used to specify which properties developers can and cannot use for their Pods. When you declare a PodSecurityPolicy, it will be added to the Admission control plugin we talked about in lesson 11. When a developer creates a Pod, the Pod's config will be passed through this plugin to check according to the policy we defined. If the Pod uses any security context attribute that we do not allow, it will not be created and the API server will return an error to the developer.
PodSecurityPolicy can define the following policies:
Pod can use host's IPC, PID, hostNetwork or not
Which userID the container can use
Can I use privileged mode or not?
Which kernel capabilities are allowed to be added or removed
Can containers use the readOnlyRootFilesystem attribute?
What volume can Pod use?
...
For example, create the pod-security-policy.yaml file as follows:
In the config file above, we do not allow Pods to use hostIPC, hostPID, hostNetwork and privileged properties. You can use the readOnlyRootFilesystem property. Containers can be run with any user. And Pod can use any type of volume. When we create this PodSecurityPolicy, now when we try to create the Pod in the pod-privileged.yaml file, it will give an error.
This is a way for us to prevent developers from creating Pods with permissions we don't want. But we said above that this PodSecurityPolicy is a cluster resource, meaning it will apply to the entire cluster and all users, so how can we apply the policy to each namespace and each user?
Assign PodSecurityPolicies for each user
So to solve this problem, we will use RBAC that we talked about in the previous article. We will create a ClusterRole and assign it to PodSecurityPolicies by name, and use ClusterRoleBinding to assign that ClusterRole to the user. And if we want to specify the namespace scope, we add a Role that only allows that user to access a namespace. We will make an example to make it easier to understand, create a file psp-privileged.yaml:
Next we will create 2 ClusterRoles corresponding to 2 PodSecurityPolicies.
In the above command, we use ** --verb=use** and specify the resoucre we want to assign to the clusterrole as podsecuritypolicies with the --resource option . Finally, we specify the name of the podsecuritypolicies with the --resource-name option .
Next we connect these 2 ClusterRoles to the user we want, for example here we have 2 users Ronaldo and Messi .
To create more users inside kubernetes, we will use kubectl with the following command:
After running the above command, we will have 2 users. Now we will use these 2 users to create a Pod. We will see that each PodSecurityPolicies will be applied to each correct user. To simulate a user, when typing the command, add --user .
So only ronaldo user can create pods with privileged rights. We have finished learning how to secure cluster nodes, next we will see how to secure the network.
Security network
By default in our cluster, all pods in a namespace and different namespaces can see each other and talk to each other. For example, if we have 2 projects in 2 different namespaces, the containers of these 2 projects can talk to each other normally if there is nothing encapsulating the network of a namespace. When running in reality, we usually don't want that.
Kubernetes provides us with a resource called NetworkPolicy, which helps us define which pods can talk to which pods. This NetworkPolicy will select pods based on the same label as Service. The ingress rules attribute defines what traffic can reach the Pod, and the egress rule defines where the Pod can call.
Prevent all traffic to Pods in a namespace
First we will create a NetworkPolicy to block all traffic to the Pod. Create a file named network-policy-default-deny.yaml:
In the file above, we specify the podSelector field to be empty, which means it will match the entire label, meaning we will select the entire Pod namespace.
Allows several Pods in the namespace to connect to each other
Now we will write another policy, only allowing traffic from the web server to connect to the DB. Create a file named network-policy-postgres.yaml:
In the config file above, we use podSelector to specify all pods that have the label app: database , which will allow connections from the pod with the label app: webserver we define in the ingress field, and at port 5432.

We can also configure the network based on namespace and CIDR notation. You can read more about NetworkPolicy here .
Conclude
So we have learned about how a container can access the server node, and how the kubernetes administrator can prevent that, and we have also seen how we can package the network of Pods together using NetworkPolicy. If you have any questions or need further clarification, you can ask in the comment section below. In the next article we will talk about how to limit the resources of a Pod. Instead of letting the Pod run as many resources as possible, we should define which Pod is more important and should have more resources.
Last updated