Downward API
An application will often need information about the environment it is running in, including detailed information about itself and information about other applications running in the same environment. For example, a web server needs to know information about the database address and redis address. A network application needs to know the name of the worker node it is deployed to. A monitor application needs to know information about the applications it needs to monitor.
As for information about database and redis addresses, we can know in advance and transmit it through the Pod's env configuration. But as for information about the name of the worker node to which the Pod will be deployed, we cannot know in advance. For example, if we have 10 worker nodes, we do not know which node the Pod will be deployed to. Specify env first. We only know when the Pod has been deployed to that node. If so, how can we pass the name of that node into the application?
Another example is that we have an application that needs to know the name of the Pod it belongs to, but if we deploy the Pod using ReplicaSet, the Pod name will be random, we cannot know the name of the Pod unless it has been created, so how can we pass that value to the application through the Pod's env configuration? Then kubernetes provides us with a guy called the Kubernetes Downward API to support the above cases.
Downward API
The Downward API allows us to pass the Pod's metadata and its environmental information inside the container. We can use this information and pass it through the Pod's env config, or the Pod's volume config to pass to the container as a file. And don't let the name of the Downward API confuse you, it's not a REST endpoint, it's just a way for us to pass the Pod's meta information into the container.
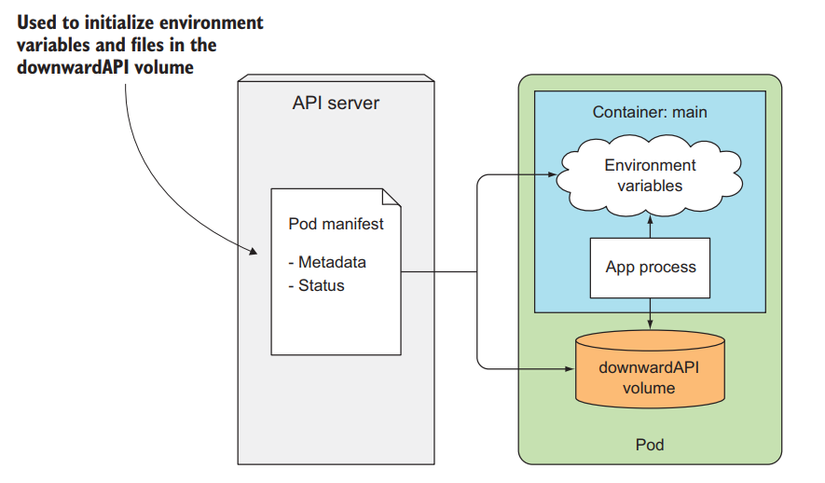
Pod metadata that Downward API supports
Downward API allows us to pass the following information to the container:
Pod's name
Pod's IP
Pod namespace
Name of the node the Pod is running on
The name of the ServiceAccount (will be discussed in the following articles) of the Pod
CPU and memory requirements of each container
CPU and memory limits per container
Labels of Pod
Pod Annotations
All of the above attributes can be transmitted to the Pod via env, except for labels and annotations, which must be transmitted as a volume file.
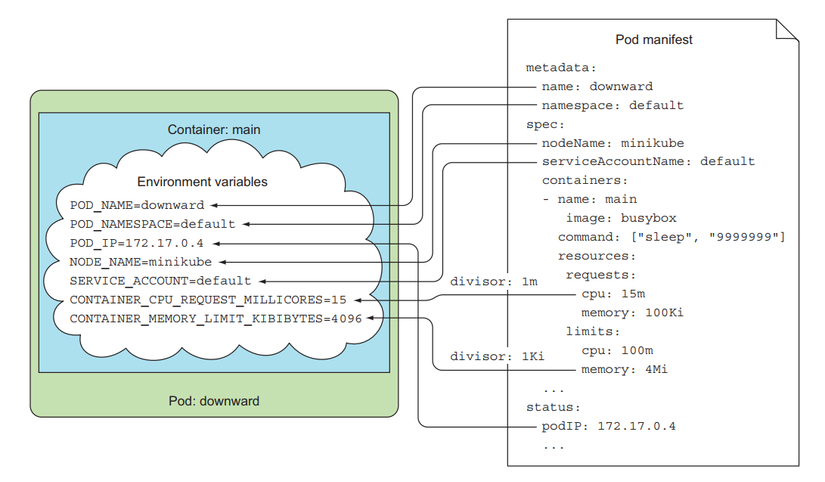
Passing metadata using env
Now we will create a Pod and pass the Pod's metadata to the container. Create a file named downward-api-env.yaml with the following configuration:
We will use the fieldRef and resourceFieldRef properties in the Pod's env config to pass metadata to the container through the Downward API. With fieldRef we will specify the fieldPath attribute for it, and access the name of the Pod used metadata.name, the name of the worker node used spec.nodeName.
For the env that accesses the container's resource requests and limits, we specify the divisor field, the values of requests and limits will be divided by this number to get the value we pass into the container. For example, in the above config we specify requests.cpu as 15m, divisor as 1m => then the CONTAINER_CPU_REQUEST_MILLICORES env value will be 15m/1m = 15. limits.memory is 8Mi, divisor 1Ki => then the CONTAINER_MEMORY_LIMIT_KIBIBYTES env value will be 8Mi/1Ki = 8192.
Create Pod and test:
You will see the Pod's metadata information already in the container's env. And our application can use the envs we need.
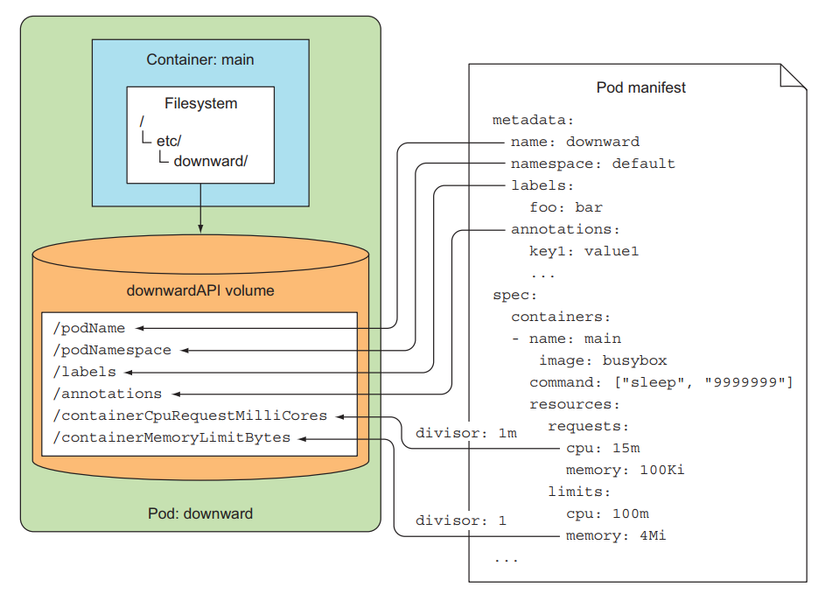
Transfer metadata using volume files
Now we will pass the metadata through the volume config and mount it into the container as a file. Create a file named downward-api-volume.yaml with the following configuration:
Here we will specify the volume and use the downwardAPI property to pass metadata to the container in the form of a file located in the /etc/downward folder. When using in volume form, when declaring the resourceFieldRef's config, we need to add the containerName attribute to select the container for which we want to receive requests and limit.
Create Pod and test:
As you can see, using the Downward API is not very difficult. It allows us to transfer basic information of the environment and necessary information of the Pod into the container. But the data it supports is quite limited, we cannot access information about other Pods using the Downward API. If we need to access more information, we will use the Kubernetes API server, a true REST API.
Kubernetes API server
This is a REST API, allowing us to call it and get necessary information about our cluster, but using it is not as easy as the Downward API.
To call the API server, we need authentication to be able to call the API server. Before talking about how to interact with the API server, we will see what it is like first.
Explore the API server
To check the URL of the API server, we run the command:
Depending on your environment, this URL will print as an IP or a DNS, with port 6443. We send the request to the API server.
You will see it print an error, because this URL runs HTTPS, to call it, we pass params --insecure (or -k).
At this point, we have called the kubernetes API server, but it will return a 403 error because we need authentication to call it. There are many ways to authenticate to the server, but now to test, we can use kubectl proxy to expose the server API without having to authenticate to it.
Open another terminal.
Yep. We have called the API server, you will see the results it returns are API server endpoints that you can call.
Interact with API server
In the paths array, you will see a path called /api/v1, this is the path containing our basic resources. Do you remember that when declaring a config file, we usually specify the apiVersion attribute first? That attribute will be related to these paths.
For example, when declaring a Pod, we need to specify apiVersion: v1 , which corresponds to the Pod resource that will be in API /api/v1. Let's call this link to try:
We will see that it lists all the resources that are in it, including Pod and Configmap.
We can list all Pods in a namespace by calling the API path as follows:
If there is any Pod, it will display in the items attribute. API path structure <api-server-url>/api/v1/namespaces/<namespace-name>/pods, list all pods located in <namespace-name>the namespace you can specify, above we list all pods located in the default namespace.
If we want to list pods in another namespace, we will specify the namespace name above the path, like this:
To get information about a Pod, we call the following link:
With structure <api-server-url>/api/v1/namespaces/<namespace-name>/pods/<pod-name>. At this point, we know how to interact with the API server using kubectl proxy, but inside a container, how will we interact with it?
API server interaction inside the Pod container
To interact with the API server inside the Pod, we need to know its URL. kubernetes has provided us with a default ClusterIP for the API server.
We have a service called kubernetes, so inside the container, we can call the API server using the URL https://kubernetes. We create a pod and access it to test:
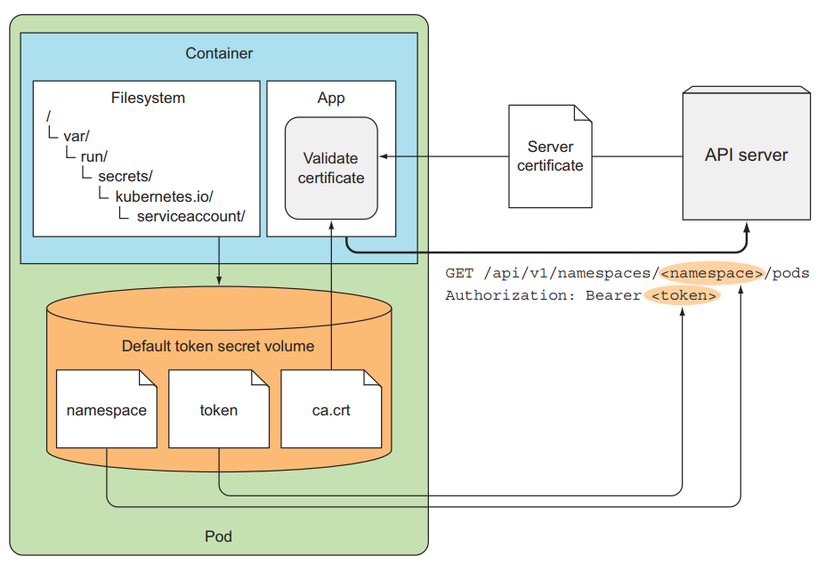
We have access to the Pod, now we will send a request to the API server. Above, when we call, we pass options -k, in reality we should not do that, but we will use the server file. certificate to verify with HTTPS server, the CA file and information to authenticate to the API server will be in a folder /var/run/secrets/kubernetes.io/serviceaccount/inside a container, there will be 3 files that are automatically mounted inside a container when the container is created, the information of These 3 files are located in a resource called ServiceAccount, we will talk about this resource later, for now we just need to understand that we will use it to authenticate to the API server.
Jump to folder /var/run/secrets/kubernetes.io/serviceaccount/.
When we list it, we will see a ca.crt file, this is the server certificate for us to verify with HTTPS of the API server. We will use it as follows:
OK. We have called the API server. Now we will authenticate with the API server. You will see a file called token, we use this file to authenticate with the API server.
Yep, so we have interacted with the API server and been able to call it without getting a 403. In a container, we will use 3 files that are automatically mounted inside the Pod container via ServiceAccount to authenticate to the API server. This is an illustration.
There are some clusters where you will need to enable RBAC (will be discussed in the article about ServiceAccount) to be able to authenticate to the API server.
Introducing AMBASSADOR containers pattern in Kubernetes
Instead of having to do a lot of things like using ca.crt and using token files, we can use a pattern called ambassador. This pattern will deploy an additional container in the same Pod as the main container. This sub-container will be called Sidecar Container, which will support functionality for the main container. Here, this sidecar container will be in charge of authentication to the API server. The main container just needs to call the sidecar container and it will send the main container's request to the API server.
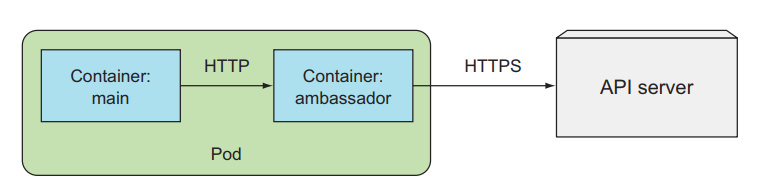
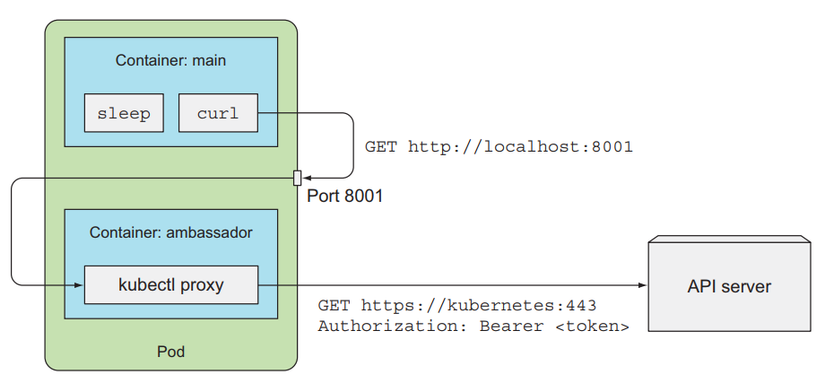
Using this pattern will make it easier for us to interact with the API server.
Use the SDK to interact with the API server
If we only perform simple tasks with the API server such as list resources, then we can call via REST API for simplicity. But if we want to interact more with the API server, then we should use the client library. Kubernetes has a number of SDKs corresponding to languages that we can use to work with API servers:
Golang client: https://github.com/kubernetes/client-go .
And there are many other SDKs, you can see here .
Example of code to create a namespace using nodejs sdk:
As you can see, using the Kubernetes API server, we can get information about other applications inside the cluster, and cluster information if we need it.
Last updated