# Managing and calculating resources used for Pods
we create those Pods without caring about how much CPU and memory they will need to run or are limited to only how much CPU and memory they can use. chief. But when running in reality, determining the resources of each Pod is very important, it will help our applications achieve good performance when running in the cluster. For example, we have 2 services, one handles notifications, the other handles transactions. We don't want the notify service to run and take up all the resources of the transaction processing service, because the transaction service is more important.
In this article we will see how to configure and manage resource requests and resource limits of a Pod in the most effective way.
### Requesting resources
When writing a Pod's configuration, we can add properties to specify the total amount of CPU and memory of a container that it needs to run (called resource requests), and the total amount of CPU and memory that it can only handle. We can consume that much, but we cannot consume more than the total amount we have specified (called the resource limit).
We will specify properties for each container in the Pod, and the resouce requests - resource limits of a Pod will be added up from its containers.
#### Create Pod with resource requests
Now let's do an example to understand better, create a file named requests-pod.yaml with the following configuration:
```yaml
apiVersion: v1
kind: Pod
metadata:
name: requests-pod
spec:
containers:
- name: main
image: busybox
command: ["dd", "if=/dev/zero", "of=/dev/null"]
resources:
requests:
cpu: 200m # The container requests 200 millicores (that is, 1/5 of a single CPU core’s time).
memory: 10Mi # The container also requests 10 mebibytes of memory.
```
In the file above, we use the **resources.requests.cpu** attribute to specify the amount of CPU this container needs, and **resources.requests.memory** to specify the amount of memory this container needs. Now we create a Pod and test its CPU with the top command:
```none
$ kubectl apply -f requests-pod.yaml
pod/requests-pod created
$ kubectl exec -it requests-pod top
Mem: 8006084K used, 143884K free, 214440K shrd, 74888K buff, 930220K cached
CPU: 7.6% usr 12.9% sys 0.0% nic 73.8% idle 1.1% io 0.0% irq 4.4% sirq
Load average: 3.51 2.65 1.14 8/5061 14
PID PPID USER STAT VSZ %VSZ CPU %CPU COMMAND
1 0 root R 1308 0.0 6 12.0 dd if /dev/zero of /dev/null
8 0 root R 1316 0.0 1 0.0 top
```
The dd command running in the container can consume as many resources as it wants because we have not specified a resources limit. In the example above we see there are 6 cpu, each 12% is 120m, total is 720m.
#### What do resource requests mean?
If you think that when we specify the **resources.requests** attribute for the container in the Pod, kubernetes will keep that amount of server resources for the container to run, then that's not true.
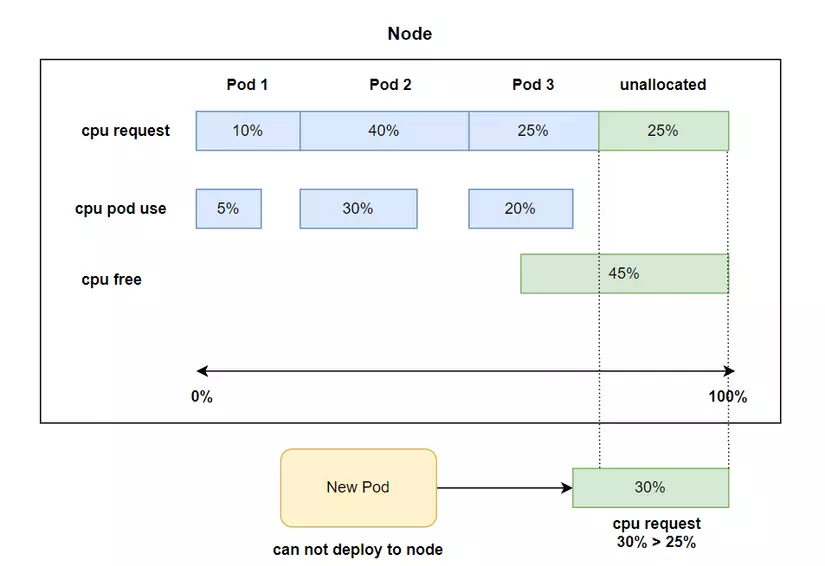
Note that one important thing is that when we specify this value, as in the example above, kubernetes will not keep 200m cpu and 10Mi memory of the server for this container to use, but this value will be used during the process. A Pod is scheduled to a worker node. The scheduler will find which worker node still has unallocated CPU greater than 200m and unallocated memory greater than 10Mi to schedule Pod to that worker node. If we do not specify **resources.requests** , then when the Pod is scheduled to a worker node, the Scheduler will not consider the worker node's CPU and unallocated memory values for the Pod. This means that if our Pod needs 200m CPU to run, but we do not specify it clearly, then a worker node only has 100m CPU, our Pod can also be scheduled to that worker node.
And another important thing is that the CPU and unallocated memory values will be calculated by the Scheduler by subtracting the node's resources from the total **resources.requests** of the Pod (if any, or if the pod's current CPU if there is no index). resource requests, or the current CPU is larger than the resource requests because we do not use limit, the Scheduler will take the larger value) on a worker node, not the value of the worker's free and unused CPU and memory. node. Even if the worker node's free value meets Pod requests and the unallocated value does not, the Pod will not be scheduled there.
In the illustration above, the Pod will not be deployed to the worker node because the current CPU request is larger than the remaining unallocated CPU of the worker node, even though the actual free CPU is up to 45%. The scheduler will not consider actual free cpu but only unallocated cpu.
#### How Scheduler uses resource requests to choose the best node for Pod
In the post [Kubernetes internals architecture](https://viblo.asia/p/kubernetes-series-bai-11-kubernetes-internals-architecture-L4x5xPjb5BM) , we talked about how the Scheduler will filter out the best nodes using an algorithm and then arrange them in order of priority to select the node with the highest priority. Then, resource requests will be used as a criterion to evaluate the priority order for the node, there are two methods: LeastRequestedPriority, MostRequestedPriority.
* LeastRequestedPriorit: will choose the node with the least total resource request, meaning the most unallocated resources.
* MostRequestedPriority: will choose the node with the highest total resource request, meaning the least unallocated resource.
The scheduler will be configured to choose one of the two methods above, by default the method used is LeastRequestedPriorit. We can configure Scheduler to use the MostRequestedPriority method instead, use MostRequestedPriority when we want our resources to be used as evenly as possible, very important in a cloud provider environment, we will want to use as few VMs as possible to Cut the cost.
#### Scheduler in action
Now we will create another pod to see if the Scheduler does it the way we said above. First we will look at the node's capacity.
```none
$ kubectl describe node
...
Capacity:
cpu: 8
ephemeral-storage: 263174212Ki
hugepages-2Mi: 0
memory: 8149968Ki
pods: 110
Allocatable:
cpu: 8
ephemeral-storage: 242541353378
hugepages-2Mi: 0
memory: 8047568Ki
pods: 110
...
Allocated resources:
(Total limits may be over 100 percent, i.e., overcommitted.)
Resource Requests
-------- --------
cpu 3475m (43%)
memory 6978796928 (84%)
...
```
There are two important properties we need to pay attention to: Capacity and Allocatable, with Capacity being the total resources of the worker node, and Allocatable being the resources that the Pod can use. We will see that it is not equal because there will be a few resources for the system to use. We shouldn't use it all. We have an allocatable cpu of 8 cores = 8000m, and an allocated cpu of 3475m. We will create a Pod that requests 3000m to see if our cpu allocation increases.
```none
$ kubectl run requests-pod-2 --image=busybox --restart Never --requests='cpu=3000m,memory=20Mi' -- dd if=/dev/zero of=/dev/null
pod/requests-pod-2 created
```
If you run kubelet version greater than 1.21, you will receive the following message:
```none
Flag --requests has been deprecated, has no effect and will be removed in the future.
```
If you encounter this error, create a config file and do not use cli. Now let's describe the node again:
```none
$ kubectl describe node
...
Allocated resources:
(Total limits may be over 100 percent, i.e., overcommitted.)
Resource Requests
-------- --------
cpu 6475m (80%)
memory 6999768448 (84%)
...
```
We will see that now our CPU allocation has increased to 6475m. If we create another Pod with a request of 3000m, our Pod will not be able to deploy to the node.
```none
$ kubectl run requests-pod-3 --image=busybox --restart Never --requests='cpu=3000m,memory=20Mi' -- dd if=/dev/zero of=/dev/null
pod/requests-pod-3 created
$ kubectl get pod
NAME READY STATUS RESTARTS AGE
requests-pod-2 1/1 Running 0 6m10s
requests-pod-3 0/1 Pending 0 44s
```
Our Pod requests-pod-3 will be in pending state because it is not deployed to the pod. When we describe the pod, we will see the reason is that no worker node has enough CPU for the Pod:
```none
$ kubectl describe pod requests-pod-3
...
Events:
Type Reason Age From Message
---- ------ ---- ---- -------
Warning FailedScheduling 55s (x3 over 2m2s) default-scheduler 0/1 nodes are available: 1 Insufficient cpu.
```
### Limiting resources
We have understood how to use resources requests, now we will see how to use resources limit, to avoid one Pod taking up the resources of other Pods. Create a file named limited-pod.yaml with the following configuration:
```yaml
apiVersion: v1
kind: Pod
metadata:
name: limits-pod
spec:
containers:
- name: main
image: busybox
command: ["dd", "if=/dev/zero", "of=/dev/null"]
resources:
limits:
cpu: 1000m # The container limits 1 cpu core.
memory: 20Mi # The container limits 20 mebibytes of memory.
```
**In the config file above, we use the resources.limits** attribute to specify the resource limit of a container. If we do not specify the request attribute, by default it will be assigned equal to the value of limits. Create file and test:
```none
$ kubectl apply -f limited-pod.yaml
pod/limits-pod created
$ kubectl exec -it limits-pod top
Mem: 7462364K used, 687604K free, 174260K shrd, 151972K buff, 1245064K cached
CPU: 6.7% usr 10.8% sys 0.0% nic 78.0% idle 0.4% io 0.0% irq 3.9% sirq
Load average: 2.10 1.31 1.30 4/4106 13
PID PPID USER STAT VSZ %VSZ CPU %CPU COMMAND
1 0 root R 1308 0.0 1 12.1 dd if /dev/zero of /dev/null
7 0 root R 1316 0.0 4 0.0 top
```
We will see that above when we have not specified the limit, the cpu core we can use is 6. After we specify, the cpu core we can use is now only 1.
#### When a container exceeds limit
So what happens when one of our containers uses resources beyond the limit resource we specified. Then there will be two cases:
* Regarding cpu, when our container needs more than the number of cpu we have specified in the limit, it cannot use more than this cpu, it can only use the cpu we have specified.
* For memory, it will be different. When our container exceeds the allowed limit, this container will be killed. If we specify the restartPolicy mentioned in [lesson 12](https://viblo.asia/p/kubernetes-series-bai-12-understand-pod-internal-jvElaqemlkw#_pods-conditions-3) as Always or OnFailure, our container will automatically restart. .
### QoS classes
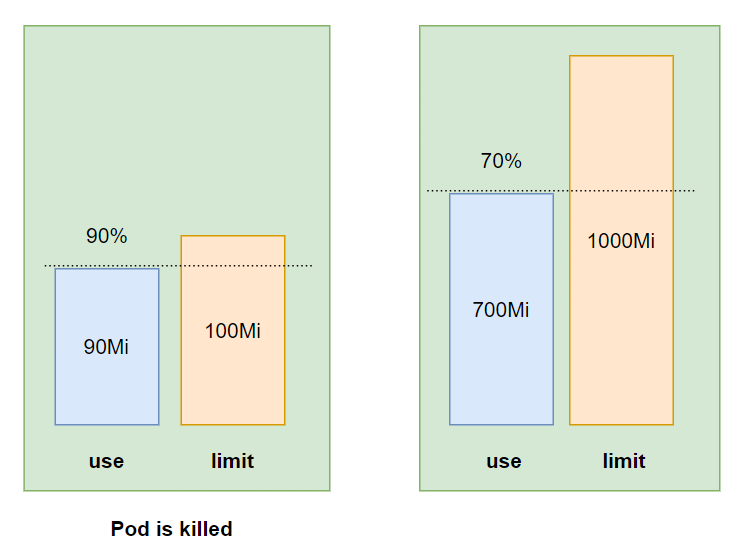
Unlike cpu limit, our total memory limit when configuring can exceed 100% of the worker node's memory. So what happens if a Pod runs out of worker node's memory, will that Pod be killed or will another Pod be killed?
For example, we have two Pods, one A with limit 550Mi memory, one B with limit 600Mi memory, our worker node memory only has 1G RAM. Now guy A is running and taking up 500Mi, guy B is running and taking up 400Mi, then guy B is running and taking up 550Mi of memory, the two guys combined are 1050Mi, exceeding the memory of the worker node, while no one is running over the memory. Its limit is over, so who will be killed?
So kubernetes provides us with a way to rate the priority of Pods. Pods with lower priority will be killed first. Quality of Service (QoS) is how kubernetes prioritizes Pods, there are 3 QoS:
* BestEffort (lowest priority)
* Burstable
* Guaranteed (highest priority)
QoS will be assigned to the container, then combining all the QoS of the container we will get the QoS of the Pod.
#### Determine the QoS of the container
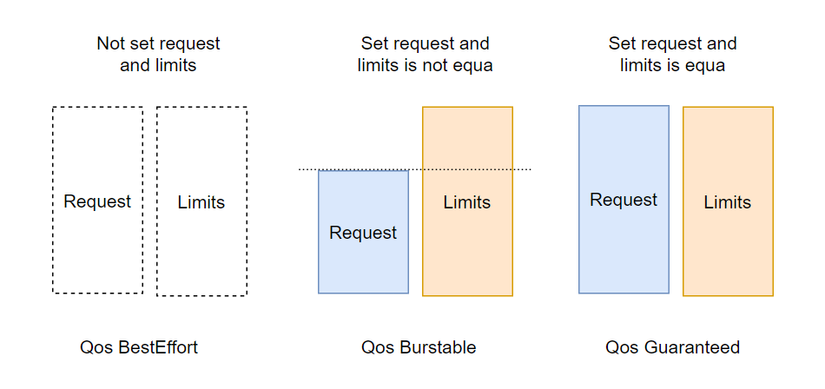
BestEffort is the container with the lowest priority, this QoS class will be assigned to the container without specifying resources requests and limits attributes. If the worker node's memory exceeds 100%, the Pod with class BestEffort will be killed first.
Burstable is a container with medium priority. This QoS class will be assigned to containers that specify each resource request, or specify that the values of the two attributes resources requests and limits are not equal, Pods with class Burstable will be killed. when no more Pods with class BestEffort exist.
Guaranteed is the container with the highest priority, killed last. This QoS class will be assigned to the Pod that:
* Specify both resources requests and limits in the container. Or specify each resource limit, resource requests will default to the value of resource limits.
* These two attributes must have equal values.
#### Determine the Pod's QoS
If all containers have the same QoS class, then that QoS will be the Pod's QoS, otherwise, the QoS will be combined according to the following table:
| Container 1 QoS class | Container 2 QoS class | Pod’s QoS class |
| --------------------- | --------------------- | --------------- |
| Best Effort | Best Effort | Best Effort |
| Best Effort | Burstable | Burstable |
| Best Effort | Guaranteed | Burstable |
| Burstable | Burstable | Burstable |
| Burstable | Guaranteed | Burstable |
| Guaranteed | Guaranteed | Guaranteed |
#### Understand how Pods are killed when memory exceeds the worker node's limit
As we said above, when the worker node's memory exceeds 100%, the Pod with Qos as BestEffort will be killed first, followed by the Pod with Qos as Burstable, and finally Guaranteed.
#### How Pod with QoS will be killed
Each of our processes will have an OutOfMemory (OOM) score. When Pods have the same QoS class, the process with higher OOM will be killed first. OOM score will be calculated by the number of memory requests and the number of memory processes currently in use. Whoever is using the higher percentage of memory with the request will be killed first.
### Configure default request and limit for namespace
We have learned how to use requests and limits, by specifying properties for each specific container. If we do not specify, the Pod will spend as much as it wants, so it would be good to have a way to configure requests and limits with a default value for a container when we do not specify its requests and limits.
#### LimitRange resource
Instead of having to configure each container separately, we can create a resource called LimitRange, to specify default requests and limits in a namespace for us.
LimitRange will have two uses, specifying the minimum and maximum of requests and limits, and the default value when we do not specify properties in the container.
When we create LimitRange, it will be configured inside the Admission control plugin that we talked about in [lesson 11](https://viblo.asia/p/kubernetes-series-bai-11-kubernetes-internals-architecture-L4x5xPjb5BM#_admission-control-plugin-9) .
#### Create LimitRange
Now we will create a LimitRange resource, create a file called limits.yaml with the following configuration:
```yaml
apiVersion: v1
kind: LimitRange
metadata:
name: example
spec:
limits:
- type: Pod
min:
cpu: 50m
memory: 5Mi
max:
cpu: 1
memory: 1Gi
- type: Container
defaultRequest:
cpu: 100m
memory: 10Mi
default:
cpu: 200m
memory: 100Mi
min:
cpu: 50m
memory: 5Mi
max:
cpu: 1
memory: 1Gi
maxLimitRequestRatio:
cpu: 4
memory: 10
- type: PersistentVolumeClaim
min:
storage: 1Gi
max:
storage: 10Gi
```
In the config file above, we specify the limit for 3 components: Pod, Container, PersistentVolumeClaim. We specify the Pod's cpu minimun as 50m and memory as 5Mi, maximun as 1 cpu and 1Gi memory. For containers, we specify the default value of the request with the **defaultRequest** attribute and the default value of limit with the **default** attribute , and the max and min attributes are similar to those of the Pod. We can also specify a value for storage with type PersistentVolumeClaim.
We create and test whether LimitRange works as we want.
```none
$ kubectl apply -f limits.yaml
limitrange/example created
$ kubectl run requests-pod-big-cpu --image=busybox --requests='cpu=3'
The Pod "requests-pod-big-cpu" is invalid: spec.containers[0].resources.requests: Invalid value: "3": must be less than or equal to cpu limit
```
If it prints this error, then our LimitRange is working correctly, we only allow maximun cpu request to be 1 core, above we request 3 cores so we cannot create a Pod.
We check and see that LimitRange has correctly validated the min and max of a Pod that can be created. Now let's check if it specifies default requests and limits values for us.
```none
$ kubectl run pod-no-setting-resoucre --image=busybox --restart Never -- dd if=/dev/zero of=/dev/null
pod/pod-no-setting-resoucre created
$ kubectl describe pod pod-no-setting-resoucre
Name: pod-no-setting-resoucre
Namespace: default
...
Containers:
pod-no-setting-resoucre:
Container ID: docker://9add62820682c8ef4cae6e647b3180b396118cfdfdaac857f3fd396b686e10b2
Image: busybox
...
Limits:
cpu: 200m
memory: 100Mi
Requests:
cpu: 100m
memory: 10Mi
...
```
Check the terminal and we will see that our container has been assigned default requests and limits values. LimitRange already works as we want.
### Limit the total number of resources of a namespace
We have seen the convenience when we use LimitRange. But you can notice that LimitRange only limits the resources of an object in a namespace, but cannot limit the total usable resources of a namespace. When working on a project with many different teams, we will want each team to only be able to use the amount of resources we assign to them, this team should not use other teams' resources. To do that, kubernetes provides us with a resource called ResourceQuota.
#### ResourceQuota
This is a resource that will help us limit the resources of a namespace. When we create a ResourceQuota resource, it will be configured in the Admission Control plugin like LimitRange. When a Pod is created, it must go through this plugin to check whether the Pod is valid or not. whether or not the resource limit we specified in ResourceQuota is used, if so, the API server will return an error.
ResourceQuota not only limits the resource usage of Pods and storage of PersistentVolumeClaims, but can also limit the number of Pods and PersistentVolumeClaims that can be created in a namespace.
#### ResourceQuota limits cpu and memory
Now we will look at an example to make it easier to understand, create a file named quota-cpu-memory.yaml with the following configuration:
```yaml
apiVersion: v1
kind: ResourceQuota
metadata:
name: cpu-and-mem
namespace: default
spec:
hard:
requests.cpu: 400m
requests.memory: 200Mi
limits.cpu: 600m
limits.memory: 500Mi
```
In the config file above, we will specify the total request resource of the default namespace as 400m cpu and 200Mi memory. When we create a Pod, we cannot specify a request larger than this number, and the total resource it uses is limited. is 600M CPU and 500Mi memory. When we create this ResourceQuota, all Pods in the namespace can only use a maximum of 600m CPU and 500Mi memory. For example, if we need to create a Pod with a request of 200m cpu, we can only create a maximum of 3 Pods in the default namespace.
After we create a resource, we can see how many resources have been used within the quota with the describe command:
```none
$ kubectl apply -f quota-cpu-memory.yaml
resourcequota/cpu-and-mem created
$ kubectl describe quota cpu-and-mem
Name: cpu-and-mem
Namespace: default
Resource Used Hard
-------- ---- ----
limits.cpu 0 600m
limits.memory 0 500Mi
requests.cpu 0 400m
requests.memory 0 200Mi
```
If we delete all the Pods created above, we will see that all 4 parameters are 0. Now we will create a Pod and check to see if this number increases:
```none
$ kubectl run quota-pod --image=busybox --restart Never --limits='cpu=300m,memory=200Mi' -- dd if=/dev/zero of=/dev/null
pod/quota-pod created
$ kubectl describe quota cpu-and-mem
Name: cpu-and-mem
Namespace: default
Resource Used Hard
-------- ---- ----
limits.cpu 300m 600m
limits.memory 200Mi 500Mi
requests.cpu 300m 400m
requests.memory 200Mi 200Mi
```
We see that the value here has increased exactly as we want, now we will create a Pod that requires 400m cpu, this time it will report an error:
```none
$ kubectl run quota-pod-1 --image=busybox --restart Never --limits='cpu=400m,memory=200Mi' -- dd if=/dev/zero of=/dev/null
Error from server (Forbidden): pods "quota-pod-1" is forbidden: exceeded quota: cpu-and-mem, requested: limits.cpu=400m,requests.cpu=400m,requests.memory=200Mi, used: limits.cpu=300m,requests.cpu=300m,requests.memory=200Mi, limited: limits.cpu=600m,requests.cpu=400m,requests.memory=200Mi
```
You will see the error that **pods "quota-pod-1" is forbidden: exceeded quota: cpu-and-mem** , meaning that Pod quota-pod-1 exceeds the limit of our current ResourceQuota, so the Pod cannot be created. go out.
#### ResourceQuota limits persistent storage
To limit persistent storage of a namespace, we create a file with the following configuration:
```yaml
apiVersion: v1
kind: ResourceQuota
metadata:
name: storage
spec:
hard:
requests.storage: 500Gi
ssd.storageclass.storage.k8s.io/requests.storage: 200Gi
standard.storageclass.storage.k8s.io/requests.storage: 300Gi
```
In the config file above, the request limit for all PersistentVolumeClaims in the default namespace is 500Gi. We can also clearly specify the request limit for each specific StorageClass, by prefixing the StorageClass name as follows `.storageclass.storage.k8s.io/requests.storage`.
#### ResourceQuota limits the number of resources that can be created
Besides resource and storage limits, we can also use ResourceQuota to specify the number of resource objects we can create in a namespace, for example:
```yaml
apiVersion: v1
kind: ResourceQuota
metadata:
name: objects
spec:
hard:
pods: 10
replicationcontrollers: 5
secrets: 10
configmaps: 10
persistentvolumeclaims: 4
services: 5
services.loadbalancers: 1
services.nodeports: 2
```
In the config file above, we limit the number of pods that can be created in the default namespace to 10, replication controllers to 5, secrets to 10, etc. The resources that ResourceQuota can specify are:
* Pods
* ReplicationControllers
* Secrets
* ConfigMaps
* PersistentVolumeClaims
* Services: can specify the number of LoadBalancer Services and NodePort Services
#### Quota scope for Pod
For Pod, we can specify whether Quota is applied to it or not based on the following 4 properties:
* BestEffort: only affects Pods with Qos class BestEffort
* NotBestEffort: only affects Pods with Qos class Burstable and Guaranteed
* Terminating: only affects Pods with activeDeadlineSeconds attribute
* NotTerminated: only affects Pods that do not have the activeDeadlineSeconds attribute
For example:
```yaml
apiVersion: v1
kind: ResourceQuota
metadata:
name: besteffort-notterminating-pods
spec:
scopes:
- BestEffort
- NotTerminating
hard:
pods: 4
```
In the above config file, we can only create 4 pods with Qos class BestEffort and no active deadline attribute specified.
### Conclude
So we have learned about how to configure requests and limits for Pod. When running a real application on kubernetes cluster, we need to pay close attention to this index, to help our application run as best as possible. We also know how to use LimitRange to configure default requests and limits for Pods. Using LimitRange will be more convenient when we want all containers in our Pod to have requests and limits. Use ResourceQuota to limit resources for a namespace, dividing resources for each team appropriately. If you have any questions or need further clarification, you can ask in the comment section below.