Kubernetes internals architecture
Learn about the architecture of kubernetes
Before we talk about how kubernetes works, we will talk briefly about its architecture and components. As we said in the first article, a kubernetes cluster will consist of 2 main parts:
Kubernetes master (control plane)
Kubernetes worker node
The Kubernetes master will include 4 components:
etcd
API server
Controller Manager
Scheduler
The Kubernetes worker node will consist of 3 components:
kubelet
be a proxy
container runtime
Besides the main components, there are also a number of additional add-on components to enhance the functionality of kubernetes cluster such as:
Kubernetes DNS server
Dashboard
Ingress controller
Container Network Interface network plugin

All components are independent and have their own functions. For a kubernetes cluster to run, it needs all components at the master and worker nodes to work. We can check the status of components in the Control Plane by using the command:
How do these components communicate with each other?
All of the above system components communicate with each other through the API server, they do not communicate directly with each other. API server is the only component that interacts with etcd , no component other than API server interacts directly with etcd.
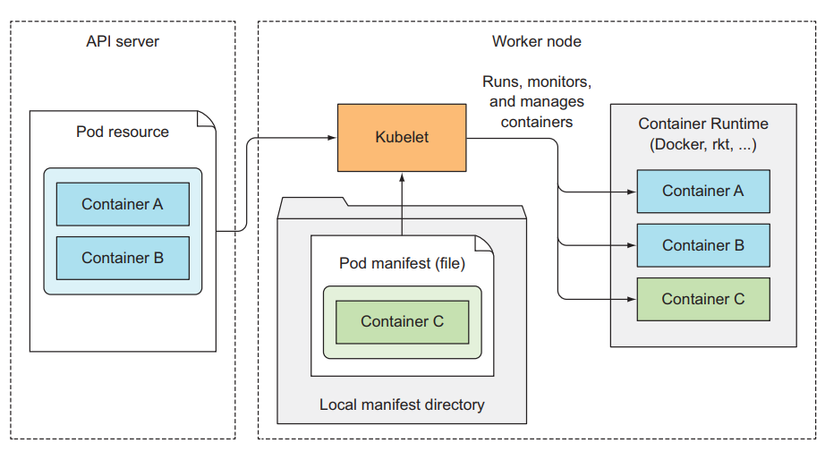
At the worker node, the runtime container will be created and managed by kubelet. kubelet will play the role of communication between master and worker node through API server.
How do these components run in the cluster?
So how do these components run in our cluster? Will it run as an application installed directly on our server? For example, when we run nginx on Linux, we need to install the following:
All components in a kubernetes cluster will not have to run as an application installed directly on the server. All components will be run as a Pod, they will be deployed to the master or worker node and run as a normal Pod and located in the namespace called kube-system . We can list and view those components:
You can see that in the master node, we have 4 components: kube-controller-manager-master, etcd-master, kube-apiserver-master, kube-scheduler-master component and 1 add-on kube-dns . At each worker node, we will have a kube-proxy component and an add-on kube-flannel-ds (Container Network Interface network plugin). These are the components that will create a kubernetes cluster (depending on the tool you use to install kubernetes, the Pod names generated for these components may be different).
You will notice that we will not see a component called kubelet , this component is the only one that runs as an application installed directly on the server, not a Pod in kubernetes. Now we will go deeper into each component. First we will talk about etcd.
Etcd
All the resources we have created in this series such as Pod, ReplicaSet, Deployment, Service,... Do you wonder how kubernetes knows which resources have been created, and when we list them, kubernetes gets them? Where does the data come from to display it? Then that information is taken from etcd. Etcd is a database that is used to store information about resources within kubernetes. Etcd is a key-value store database and. All other components will read and write data to etcd through the API server.
In addition, etcd is also a distributed storage. This means that we can have more than 1 etcd database in a cluster and all the data stored in each database is the same. So that when one database dies, we still have another database running, helping our cluster still run normally.
How are resources saved in etcd?
As mentioned, ectd is a key-value store. Then each key in etcd will be a path, that key can contain another key or value. Kubernetes stores all resources under the path /registry. We can list the data under /registry to see as follows:
You will see the resources will be stored in each corresponding path. Let's try looking at the data under /registry/pods.
There are 2 pods data belonging to 2 namespaces: default and kube-system, we list the data under default namespace.
Each line will correspond to 1 pod. We see the data stored in etcd of 1 pod.
This is the data of a Pod after it is created. When we use the command kubectl get pod kubia-159041347-wt6ga, the displayed things are taken from inside this etcd.
API server
This is the central component that is used by other components or clients. The API server provides us with a REST API so we can perform CRUD (Create, Read, Update, Delete) actions on cluster state (information about all resources in the cluster), read, write, and change cluster state. And save cluster state to etcd.
The API server will be responsible for Authentication, Authorization client, validating the resource's configuration, converting the resource into a form that can be saved in etcd. One server client API that we use most often is kubectl.
When we use kubectl to create a resource, this kubectl guy will create a POST request with the resource's config body to the API server. Then the API server will check whether this client is allowed to call it or not via the Authentication plugin, then the API will check whether this client has permission to perform this action or not via the Authorization plugin. Next, the API server will convert the original config resource into a format that can be read through the Admission control plugin. The next step API server will validate whether the config of this resource is correct or not. If everything is ok, this resource will be saved to ectd.

Authentication plugins
This is the first job of the API server, it will perform authentication with the client through one or more authentication plugins configured inside the API server. The API server will execute these plugins one by one, until it determines whose request this is from. The token used to perform this authentication step is in the header with the key Authorization, we talked about it in the article Downward API . These plugins will separate information about username, user ID, and groups inside the token. If everything is ok, this request will go to the next step which is authorization, otherwise it will return a 403 error.
Authorization plugins
This is the second job of the API server, after determining who the client is, it will check whether this client's right to perform an action on a resource or not through authorization plugins, this right is will be set up in RBAC (Role-based access control we will talk about in the following articles). For example, when we read a Secret resource, these plugins will check whether we have permission to read the Secret resource or not. If we do not have permission, it will return error 403. If the client has permission to do so, this request will be accepted. Go to the format conversion step.
Admission control plugin
If a request involves creating, updating or deleting a resource, it will be passed through this step (if the request only lists a list, the source will not). In this step, the original config resource, regardless of whether written in YAML or JSON format, is converted to a form that the API server can validate and save to etcd, through the admission control plugin. In addition, these plugins also modify some resource information before saving to etcd if we have settings in the API server.
For example, there is a resource that will configure the cpu and memory limit of the entire Pod when the Pod is created, regardless of whether your Pod has this limit configured or not. That's LimitRange resource.
The LimitRange resouce above will limit the memory limit of all Pods in the default namespace to 512Mi. When we create this resource, the API server will enable the plugin Admission Control LimitRange plugins. All pod configs will be modified to include the limit attribute before it is created. After this step, the request will be transferred to the final step.
Validate resource and save to ectd
This is the step that will check whether the config resource is correct or not. If so, the API server saves this resource to etcd, equivalent to the resource being created.
The API server will only do what we said above, note that it will not do the job of creating the Pod, or creating the ReplicaSet, all it does is save the resource to etcd, then it will send notify the component in charge of creating that resource .
That component is Controller Manager.
Controller Manager
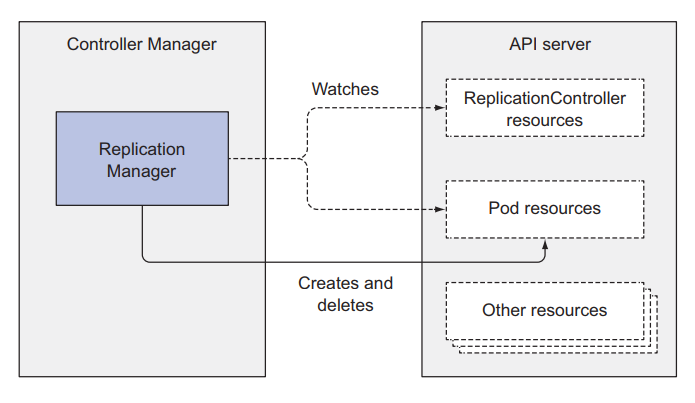
This is the component in charge of creating and deploying resources through the API server. This component will contain many different controllers, each controller will perform its own job. Some controllers like:
Replication controllers
Deployment controller
StatefulSet controller
...
From the names of the controllers, we can guess what that controller does. These controllers will listen for notifications from the API server about events that change a resource such as create, update or delete and perform actions corresponding to that change. This will create a new resource object, or update an existing one, or delete one.
Replication controllers
This is the controller that does the work related to the ReplicationControllers resource that we talked about in the 3rd lesson . It will listen for notifications from the API server about changes related to the ReplicationControllers resource, and keep track of whether the current number of Pods is equal to its replicas attribute. When it detects that the number of Pods is less than its replicas attribute, it will make a post request to the API server, so that a new Pod is created.

Deployment controller
This is the controller that will listen for changes related to the Deployment resource, in addition, it will also perform tasks such as rolling out updates, and managing the ReplicaSets below it.
StatefulSet controller
This controller is similar to replication controllers, it will manage Pods, but in addition, it will manage the PersistentVolumeClaims template for each Pod.
Each controller will manage and listen for resource changes related to it. Note that we will not have a Pod controller, instead, there will be another component to determine which worker will be selected to deploy the Pod to.
Scheduler
This is the component in charge of choosing which worker the Pod will be deployed to. What it does is listen for notifications from the API server about which Pods have been saved to ectd, but do not yet have the node attribute. It will select the appropriate worker node, then update the node properties of the Pod resource via the API server. Then, the API server will notify the kubelet at that worker node to create a runtime container corresponding to that Pod.
Although the Scheduler's job sounds simple, choose the appropriate worker node for the Pod. But the actual work that needs to be done to choose the most suitable worker node is not simple at all. Below it will run algorithms or even more importantly, a machine learning model to choose the right worker node.
Scheduling algorithm is simple
The default algorithm for selecting a simple worker node would be as follows:
Select a node that can accept Pods from available nodes
Arrange those nodes in order of priority, and choose the node with the highest priority
Select a node that can accept Pods
In this step, Scheduler will check the following criteria:
Does that Node meet the Pod's request for cpu or memory? (meaning whether the node's remaining CPU and memory is enough to accommodate the Pod's request)
Is Node running out of resources? (cpu exceeds 100% or not)
Does the Node have a label that matches the Pod's nodeSelector attribute?
If the Pod needs a port on the worker node, then see if the worker node port is used?
If the pod has a volume configuration, does the node have the appropriate volume configuration?
Consider pod affinity or anti-affinity or tolerance rule (this will be discussed in later articles).
As you can see, to choose the right node, the Scheduler will consider many criteria, and this job is not simple at all. After selecting suitable nodes, the Scheduler will proceed to the next step
Select the node with the highest priority
Although there are many nodes that can deploy pods, some nodes will be better than the rest, so the Scheduler needs to arrange those nodes to choose the best one for the Pod. If we run in a cloud environment, this Scheduler can also choose the node that saves the most money to attach to the Pod.
These are the 4 main components of the master node, next we will talk about the components of the worker node.
Kubelet
This is the component that will be responsible for interacting with the master node and managing the container runtime. When we join a worker node to the master, the first job of this kubelet will be to create a post request with the body node config to the API server to create a resource node.
It will then listen to notifications from the API server about the Pod that is scheduled to it to create the corresponding runtime container. In addition, kubelet also monitors the container and sends that information to the API server. When a Pod is deleted from the API server, the API server will notify the kubelet and it will delete the container from the node. Once completed, it will send a notification back to the API server that the container corresponding to that Pod has been removed. finished deleting.

Be a proxy
This is the component that manages the traffic and network of the worker node that is related to the Pod. In the previous articles, we created a Service so that the client can interact with our Pod. Below, this kub-proxy guy will rely on the service's config to configure the corresponding network at the worker node so that a request can be sent. gets to the Pod that is behind the Service. This kube-proxy will have 3 modes:
userspace
iptable
ipvs
The userspace mode is the first way that kube-proxy is implemented. The request from the client will go to the iptable first, then will be sent to kube-proxy, and go to the Pod.

You can simply understand iptable as a Linux service used to configure the firewall and configure the route of a request.
In this userspace mode, its performance is quite poor, so kubernetes developed the second mode, iptable. In this mode, the request will go straight from iptable to Pod. The task of kube-proxy now is to configure the path of a request to the Pod inside iptable.

In the final mode, instead of using iptable, we will use ipvs (IP vitrual service). Using ipvs will have better preformance than iptable.
How do components work together?
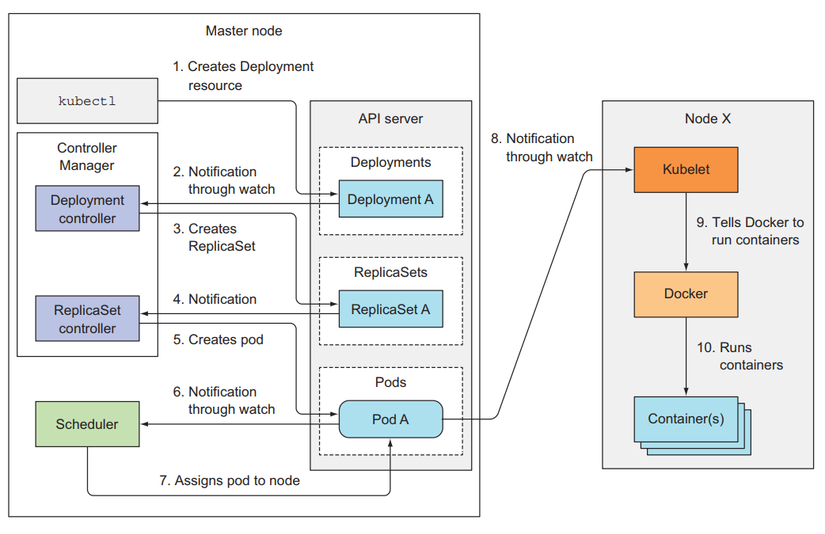
Now we will see how the components will work when a resource is created. For example, when we create a Deployment using kubelet client.
First, kubelet will extract the config file and assign it to the body of the post request, then kubelet will send this post request to the API server, the API server after doing all its work and saving the deployment resource inside etcd, At this point, the API server will send a notification to the Deployment controller. The deployment controller receives notification that a new deployment has been created, then it will find the config for the ReplicaSet template inside its config to send a request to create a ReplicaSet to the API server. After the API server saves the ReplicaSet resource into etcd, it will send a notification to the ReplicaSet controller. The ReplicaSet controller will receive the notification and send a request to create a Pod to the API server. The API server saves the Pod resource and notifies the Schedulcer, Scheduler to select the node and reports back to the API server. The API server will notify the kubelet at the corresponding worker node to create a runtime container for the Pod.

We can listen for corresponding events with the following command:
kubectl get events --watch
This is how components combine together to create a resource. You can see that each component in the kubernetes cluster will have its own functions and operate independently of each other, and when combined we will have a solution. flow is very tight.
Last updated