ServiceAccount and Role Based Access Control
Understand how kubernetes API server performs authentication
As we said in lesson 10, the API server can be configured with one or more authentication plugins. When a request goes to the API server, it will go through all of these authentication plugins. These plugins will separate necessary information such as username, user id, and group to which the client making the request belongs.
Client
There are 2 types of clients clearly distinguished by the API server:
Humans (users)
Pod (application runs inside a container)
For users, usually use kubectl or make an HTTP request with a token to authenticate to the API server. As for Pod, ServiceAccount will be used to authenticate to the API server. In this article we will talk about Pod authentication to the API server.
Groups
Both users and ServiceAccounts belong to one or more groups. The group is used to grant permissions to all users and ServiceAccounts in it at the same time, instead of having to grant permissions to each individual.
This group is separated by authentication plugin along with username and user id information, there are 4 default groups:
system:unauthenticated - assigned to a user that was not authenticated successfully.
system:authenticated - assigned to a successfully authenticated user.
system:serviceaccounts - group for all ServiceAccounts.
system:serviceaccounts:
<namespace>- group for all ServiceAccounts in a namespace.
ServiceAccounts
As we said, ServiceAccount will be automatically mounted inside the Pod container in folder /var/run/secrets/kubernetes.io/serviceaccount. Consists of 3 files: ca.crt, namespace, token.
This token file is the file that will contain information about the Pod client. When we use it to make requests to the server, the API server will separate the information from this token. And our ServiceAccount username will have the following form system:serviceaccount:<namespace>:<service account name>, with system:serviceaccount:<namespace>the group and <service account name>the name of the ServiceAccount used.
After obtaining the above information, the server will transmit this ServiceAccount username to the authorization plugins, to see if this ServiceAccount has the right to perform the current action on the API server or not.
ServiceAccount is essentially just a resource that the application inside the container can use to authenticate to the API server. We can list ServiceAccount with the command:
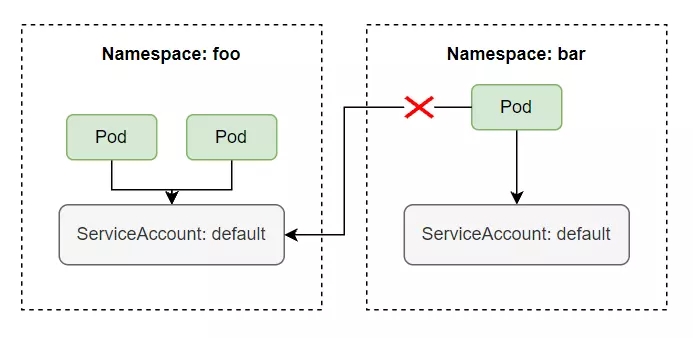
And this ServiceAccount is a namespace resource, meaning it only has scope within a namespace, we cannot use this namespace's ServiceAccount for another namespace. And each namespace will have a ServiceAccount named default that is automatically created when a namespace is created. A ServiceAccount can be used by multiple Pods within the same namespace.

Use ServiceAccount to pull images from private container registry
In this series, we have only used public container images, not private container images. When working on a real project, we will need to use a private container image, not a public container image, because we never want the container of our product to be public on the internet so everyone can download it to run it. So to download images from the private registry, in the Pod's config, we must declare the imagePullSecrets field , as follows:
The imagePullSecrets name field will contain the Secret name that we use to pull the image from the private registry. This secret name is created using the following command:
With <secret-name>is the name of the secret, docker-server is the server registry, if you use it, hub.docker.comthe server registry is docker.io, docker-username is the username you use to log into docker hub, docker-password is the password of the username corresponding to the docker hub name. For example, if we want to pull an image from the private registry registry.kala.ai, we create a secret as follows:
So if we want to pull images from private registry, every time we write config we have to add the imagePullSecrets field. We can use ServiceAccount to simplify this step. When a Pod is created, a ServiceAccount named default is automatically assigned to each Pod.
We will see that the serviceAccount field will be automatically assigned to the Pod with the value ServiceAccount default. Let's try to see the configuration of a ServiceAccount.
You will notice that the config of a ServiceAccount shown above has a field named Image pull secrets , this is the field that has the same effect as imagePullSecrets inside the Pod's config, so what we need to do now is update Update the imagePullSecrets field of the default ServiceAccount, and this ServiceAccount will automatically be assigned to the Pod, and we do not need to declare the imagePullSecrets field in each Pod's config, we update the imagePullSecrets field of the ServiceAccount as follows:
So all Pods in our default namespace can pull images from the private registry without us needing to declare imagePullSecrets when writing config for the Pod.
Create ServiceAccount
ServiceAccount is a resouce of kubernetes, so we can create and delete it like other resouce normally, even if you delete the default ServiceAccount, when creating a Pod it will give an error saying it cannot find a ServiceAccount to assign to the Pod. , then when we delete the default ServiceAccount, kubernetes will automatically recreate a new ServiceAccount for us, and the Pod will be created normally again.
Or you can also create another ServiceAccount and assign the Pod to use this new ServiceAccount instead of using the default ServiceAccount. To create a ServiceAccount is very simple, we just need to type the command:
Above, when we describe an SA, we see that it has a field named Mountable secrets , this is the name of the Secret assigned to the SA. When an SA is created, it will also create a Secret for us.
When we describe the secret generated by SA, we will see that it contains 3 files, which will be mounted inside the Pod container in folder /var/run/secrets/kubernetes.io/serviceaccount.
To use a ServiceAccount other than default inside the Pod, we specify it in the spec.serviceAccountName field .
So do we need to create another SA or just use one guy for quick results? To answer this question, by default, if an SA does not enable the Role Based Access Control authorization plugin , it will have the right to perform all actions on the API server, meaning an application in the container can use the SA. to authenticate to the API server and list Pods, delete Pods, and create new Pods normally, because it has enough rights. So to prevent that, we need to enable the Role Based Access Control authorization plugin.
Role Based Access Control
Since version 1.8.0, RBAC will be enabled by default, and we can create Roles and assign them to certain SAs. Only allow an SA to perform actions that we allow, according to the Principle of Least Privilege .
Action
The actions we can perform to the API server are HEAD, GET, POST, PUT, PATCH, DELETE. And these actions will correspond to a verb that we will use when defining the role.
Action
Verb
HEAD, GET
get
POST
create
PUT
update
PATCH
patch
DELETE
delete
RBAC resources
RBAC will have the following resources:
Roles: defines which verbs can be implemented on the namespace resource
ClusterRoles: defines which verbs can be implemented on the cluster resource
RoleBindings: assign Roles to an SA
ClusterRoleBindings: assign ClusterRoles to SA
The difference between Roles and ClusterRoles is that Roles is a namespace resource, meaning it will belong to a certain namespace, and only defines roles for SAs in a namespace. ClusterRoles will not belong to any namespace.

Create Role and RoleBinding
Now we will practice creating Roles and Clusterroles to better understand the theory. First we will create 2 namespaces:
Access Pod and make request.
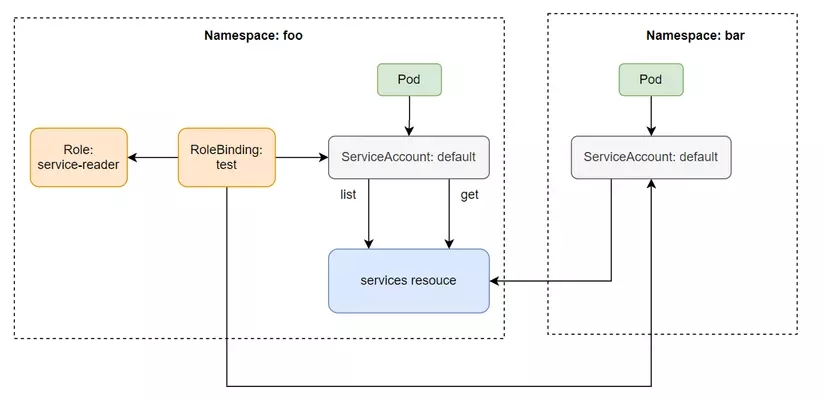
We will see that with RBAC enabled, the SA will now have no rights. To allow the default SA in namespace foo to list services in namespace foo, we need to create a Role and use RoleBinding to assign permissions to this default SA. Create a file named service-reader.yaml with the following configuration:
In the config file above, the apiGroups property will specify the group of the api we want to perform actions on, above we specify "" which means core api group /v1 path , if we want to perform actions on deployment then we will specify apiGroups as apps/v1. The verb field specifies the action we can perform on the api group group above, the resources field we specify is Service resources. Once we have created the Role, we need to bind it to SA using the following command:
Or write the config file as follows:

Now we can call the list service API inside the Pod.
We can also use Rolebinding in this namespace for SA in another namespace. By adding SA to the subjects field of the Rolebinding.
When we add the above subject, now the SA in the namespace bar can read the services in the namespace foo.

Create ClusterRole and ClusterRoleBinding
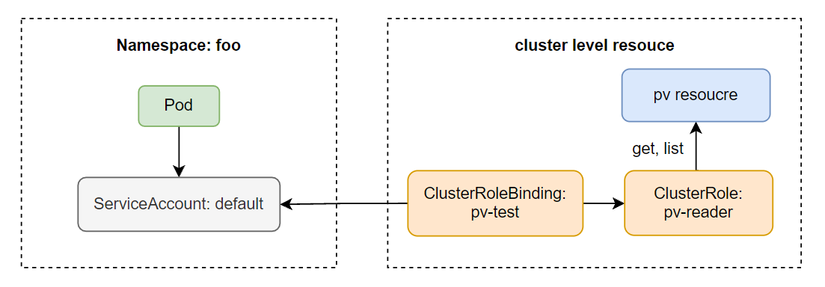
Now we will go through creating a ClusterRole. ClusterRole allows an SA to access Cluster resources such as Node, PersistentVolume, etc. In the current Pod, when we make an API request to list persistentvolumes then we will get an error.
To perform this action, we must create a ClusterRole, create a file named pv-reader with the following configuration:
The configuration of ClusterRole is the same as Role, we just need to change kind from Role to ClusterRole and do not need to specify namespace.
Then we create ClusterRoleBinding:
Now we can call the API server to list PV.

Default ClusterRole and ClusterRoleBinding
Kubernetes has a default ClusterRole and ClusterRoleBinding, we can list it with the command:
Access non-resource URLs with system:discovery
The Kubernetes API server will be divided into two main categories: urls related to resources and urls not related to resources (called non-resource URLs). Resource URLs are urls that will list resources and perform operations on resources, while non-resource URLs will not have any direct interactions related to resources, for example, urls are used to list all resources. including urls that the API server supports.
For non-resource URLs, even authenticated or unauthenticated clients with the API server can access these non-resource URLs. This role is defined in system:discovery ClusterRole and ClusterRoleBinding.
Let's take a look at the config of system:discovery:
We will see that this role will define that we have the right to get information about non-resource URLs defined in the nonResourceURLs field. Above we talked about groups, which is a way to grant permission to a group of users or to each individual user. Then the system:discovery ClusterRoleBinding will bind the role to all users belonging to the authenticated, unauthenticated group.
List all resources in a namespace with ClusterRole view
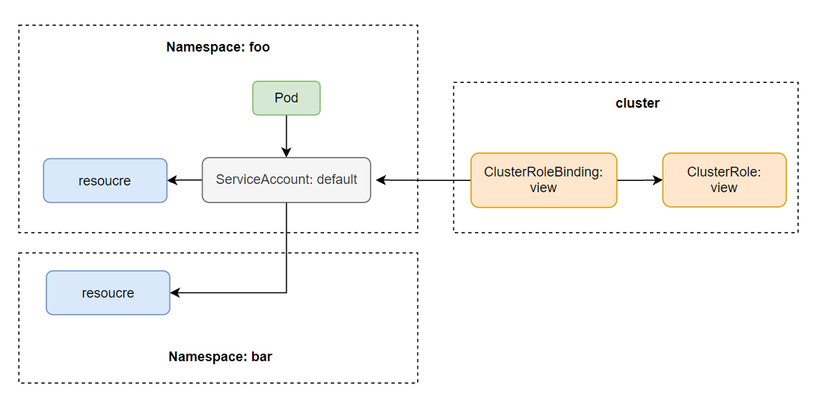
View ClusterRole will define all roles allowing us to list all resources within a namespace. Let's take a look at the view 's config :
To use the ClusterRole view , just create a ClusterRoleBinding for it:
And because it is a ClusterRole, the SA in foo namespace can also list resources other than its namespace. But we cannot use it to read the cluster resource, because it only has scope for the namespace resource. Inside the pod of foo namespace

Update resource with edit ClusterRole
eidt ClusterRole will inherit all the roles of the view and in addition, it also defines additional roles that allow us to perform the verbs create, update, patch, delete all resources within a namespace, except for Secret, Role, RoleBinding
Full control over namespace with admin ClusterRole
This admin ClusterRole allows us to have full rights on a namespace, including editing Secret, Role, RoleBinding. Except for ResourceQuotas (will be discussed in another article). The difference between edit and admin is that the admin can edit Secret, Role, RoleBinding. And the editor doesn't.
Full control over the cluster with cluster-admin ClusterRole
This guy is the guy who will give us all rights on the API server, cross namepspace, and can access cluster resources.
system:* ClusterRole
When we list the ClusterRole, we will see that there are many default ClusterRoles, including some prefixed with system:, these are the ClusterRoles used by kubernetes components. For example system:kube-scheduler is used by Scheduler.
Conclude
So we have learned about how to secure the API server using ServiceAccount with Role and ClusterRole. In practice, we should apply the Principle of Least Privilege , only allowing a person to do what he needs, not providing him with unnecessary rights. By creating different SAs and assigning a Role or ClusterRole to them, then assign that SA to the Pod. If you have any questions or need further clarification, you can ask in the comment section below. In this article, we will learn about how to secure the API server
Last updated