Deployment
Update an application running in pods
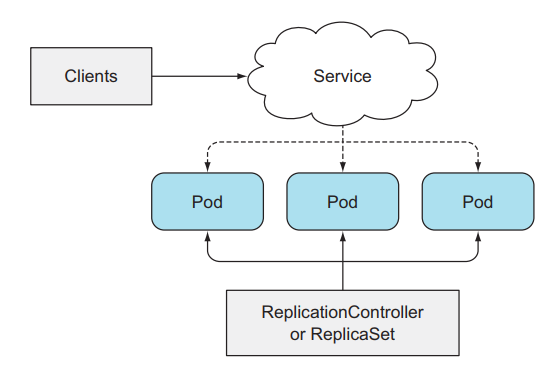
Starting with an example, we have a running application, we deploy it using ReplicaSet, with replicas = 3, it will run 3 Pods behind, and we deploy a Service to expose its traffic to external clients. .
Now that the devs in the team have finished writing the new feature, we rebuild the image with the new code, and we want to update these running Pods with the new image. How will we do it? During the deployment process, there will be many strategies to do, but the two most common ways are: Recreate and RollingUpdate
Recreate
In this way of deploying, we will first delete the entire old version of the application, then we will deploy a new version. For kubernes, first we will update ReplicaSet's Pod template, then we delete all current Pods, so that ReplicaSet creates a Pod with a new image.
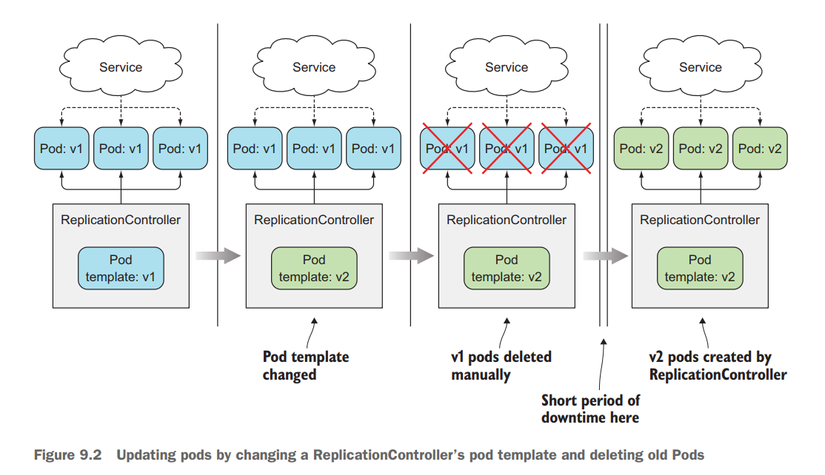
With this way of deploying, the deployment process is very easy, but we will encounter a very big problem, that is, our application will be downtime with the client, the client cannot request to our application while the new version is deployed. go up.
For systems with few clients, even if you downtime for 1 minute, 2 minutes or 1 hour, it won't have much effect, but for systems with a large number of requests around 1000-3000 requests per second, especially with banking systems. The downtime process, even for just 1 second, is not possible. So the second deployment method was born, RollingUpdate
RollingUpdate
In this way, we will deploy each new version of the application, make sure it is running, we route the request to the new version of this application, repeat this process until the entire new version of the application is deployed. and the old version has been deleted. For kubernetes, we will delete each Pod in turn and ReplicaSet will create a new Pod for us.
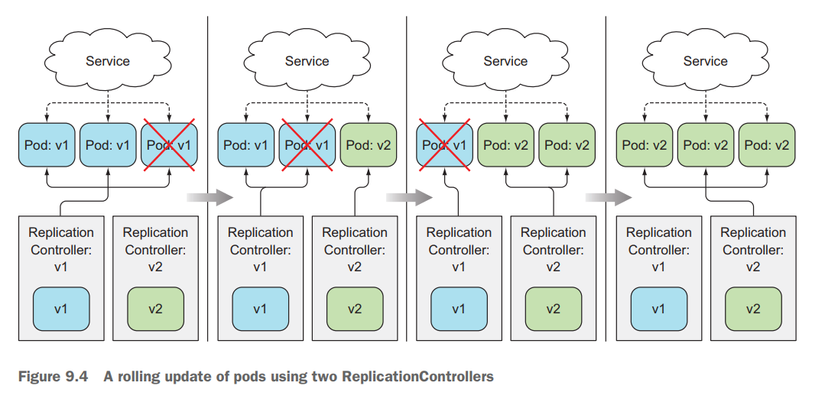
So in this way of deploying, the strength is that we will reduce the downtime of the application for the client, and the weakness is that we will have the new version and the old version of the application running at the same time. And the most difficult thing is that we have to write a script to perform this process, test this script to run correctly, it takes a lot of time and effort. For large systems, writing a script to test this deployment process is not easy at all.
Which deployment method to choose for the application depends on the situation and needs. If the application can run multiple versions of the application at the same time without any impact, then we will choose RollingUpdate. If our downtime application does not have any effect, then we will Recreate to deploy. Another way without downtime and without multiple versions of the application running at the same time is Bule-Green update. So here I am not talking about this way of deploying. You can read more here .
If we only use normal resources, the first problem we encounter is the process of updating the new version of the application and needing scripts to perform some operations such as deleting old Pods. The second problem we will encounter is that we discover that our new version is incorrect or has bugs. What should we do if we want to roll back to the previous version?
Roll back to the previous version of the app
So here we will have a way to fix the bug, build a new image, then redo the depoy method by Recreate or RollingUpdate for errors that are not urgent and not very big. As for big errors that greatly affect the client, we will usually revert the code on git, then build the image and redeploy.
For kubernetes, if we use a container to run the application, we just need to update the version of the image in the Pod template with the previous image, then use Recreate or RollingUpdate to redeploy the Pod, no need to revert the code or fix bugs immediately. Either way, it will take a lot of time to implement and run CI/CD again.
To solve the above problems, kubernetes provides a resource called Deployment .
What is deployment?
Deployment is a resource of kubernetes that helps us update a new version of the application easily. It provides 2 strategies for deploying: Recreate and RollingUpdate, all are done automatically below, and versions are available. Deployed will have a histroy behind, we can rollback and roll out between versions at any time without having to rerun CI/CD.
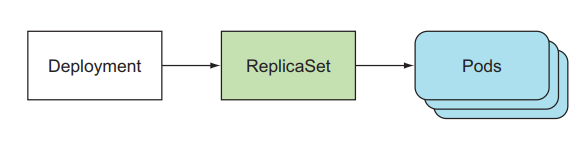
When we create a Deployment, it will create a ReplicaSet below, and the ReplicaSet will create a Pod. The flow is as follows: Deployment creates and manages ReplicaSet -> ReplicaSet creates and manages Pod -> Pod run container .
Now let's create a Deployment. Deployment's config file is mostly the same as ReplicaSet's, just change kind to Deployment. Create a file named hello-deploy.yaml:
Code of image 080196/hello-app:v1.
Create a deployment, when we create a deployment it will create a ReplicaSet below, and that ReplicaSet will create a Pod.
kubectl apply -f hello-deploy.yaml --record
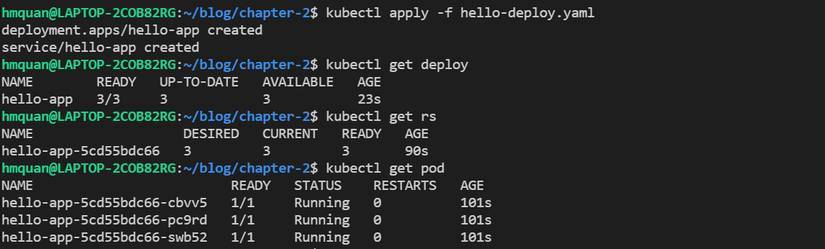
Let's test our deployment, in the file above we have created an additional Service NodePort with port 31000, we can access the application with the address localhost:31000.

So our deployment has run successfully. Now we will proceed to update the application running in the Pod. The new Pod's application will have image 080196/hello-app:v2 . The code of the image is as follows:
To update the application in Pod with Deployment. We run the following command:
kubectl set image deployment hello-app hello-app=080196/hello-app:v2
Command structurekubectl set image deployment <deployment-name> <container-name>=<new-image>
Check if the update process has completed:
kubectl rollout status deploy hello-app

If the rollout status command prints successfully, your application has been updated to the new version. We test by sending a request to the application at localhost:31000.
![]()
If Hello application v2 is printed here, then our application has been updated to the new version. As you can see, the process of deploying a version of the application is extremely simple if we use Deployment. We can also choose the deployment strategy we want extremely simply by specifying in the Deployment's strategy attribute .
How to Deploymnet update Pod
So under kubernetes, when we change the Deployment image, it will create another ReplicaSet, and that ReplicaSet will keep the new Pod template, and new Pods will be created by the ReplicaSet.
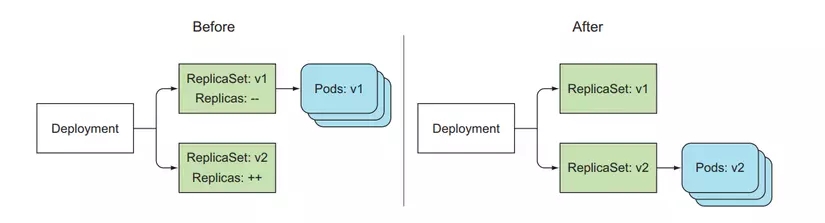
And the old ReplicaSet will not be deleted, but in this field its replicas attribute will be updated to 0. The reason why the old ReplicaSet is not deleted is that it will play a role in the process when we update the new version of the application. used, and we discover that the new version has an error, we want to roll back to the previous version, then our old ReplicaSet is still there, it will be easier for us to roll back.
Rollback to the previous version before the new version of the application fails
The image of our new version is 080196/hello-app:v3 . The code of the image is as follows, when we call request to it more than 3 times, it will return an error:
Update Deployment again
kubectl set image deployment hello-app hello-app=080196/hello-app:v3

Test it out, because we have up to 3 replicas in the back, so we may call more than 3 times for it to display the error, because each time we send a request it will lead to a different Pod.
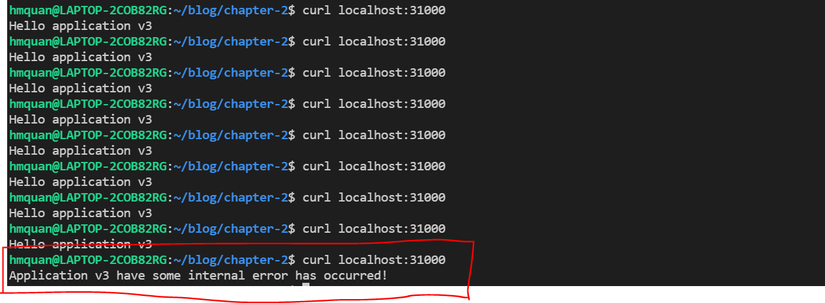
As you can see here, our v3 application has crashed, and we want to quickly roll back to the previous version, v2, so as not to affect the client. To do that, use the kubectl rollout command. First you can check the history of times our application has been updated.
kubectl rollout history deploy hello-app

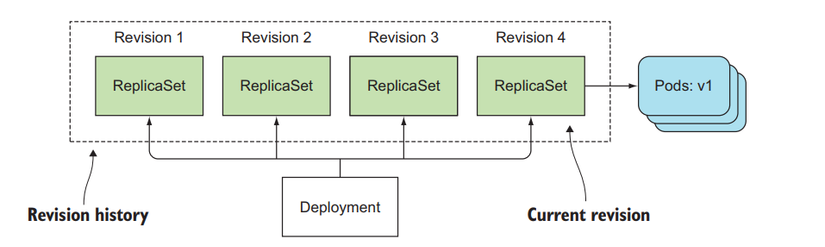
We will see that there are 3 times we have updated the application. We are at revision 3, we want to go back to revision 2, when our application has no errors
kubectl rollout undo deployment hello-app --to-revision=2
Let's test it
Yepp, our application has printed Hello application v2 , so we have successfully rolled back to the previous version. Now we just need to fix the bug and deploy the new bug-free version. Everything becomes easier, no need to revert the code on git or anything, there is still time to fix bugs without affecting the client. As you can see, this is the strong point of using Deployment to run our application. This is an illustration of revision history.
Regarding revision, by default it will be saved as 10. You can adjust the amount of history you want to save using the Deployment's revisionHistoryLimit property.
In addition, Deployment also has another great advantage: it can help us configure to deploy zero downtime applications. Although we use RollingUpdate, it is not certain that our application has zero downtime. As for configuring this, I will talk about it in the following articles. Delete the resource:
k delete -f hello-deploy.yaml

Below is the CI/CD config using Deployment with gitlabCI in practice, you can refer to it further:
Last updated