Node affinity and Pod affinity
When we run a cluster in which there are many clusters of nodes with different strengths and weaknesses. For example, a worker node cluster has resources of 1CPU 1GB RAM 250GB HDD, another worker node cluster has resources of 2CPU 2GB RAM 500GB SSD, and a worker node cluster has resources of 4CPU 4GB RAM 500GB HDD. Depending on our application, we will want the pod to be deployed to the correct worker node with the most appropriate resources.
In advanced scheduling, in addition to taints and tolerations, there will be other properties to help us do the above.
Node Selector
The first attribute we can use is nodeSelector, we will specify this attribute when declaring the pod, the value of the nodeSelector field is the label of the node. For example:
apiVersion: v1
kind: Pod
metadata:
  name: pod-node-selector
spec:
  nodeSelector:
    disktype: ssd
  containers:
    - name: main
      image: busybox
      command: ["dd", "if=/dev/zero", "of=/dev/null"]
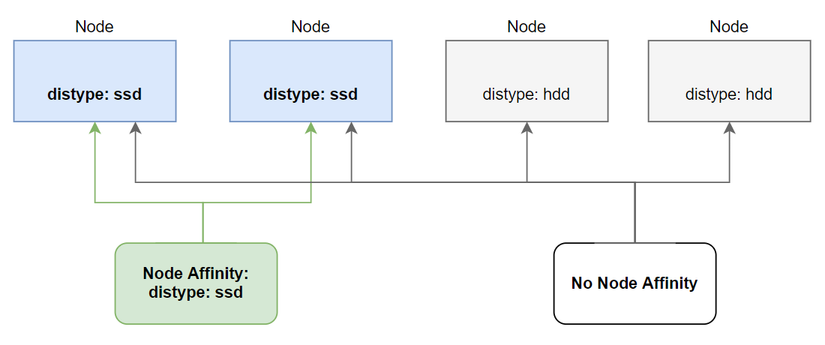
In the file above, we specify the value of nodeSelector as disktype: ssd , this pod will be deployed to nodes that are labeled disktype: ssd, to label the node, we can use the following command:
$ kubectl label nodes <your-node-name> disktype=ssdThis is the first way kubernetes gives us to deploy pods to the desired node, but it will have a drawback: if we do not have any nodes labeled as disktype: ssd or nodes with the label disktype: ssd already marked. If enough pods run on it, our pod can no longer be deployed. Because of this limitation, kubernetes provides us with another attribute that is more effective when comparing nodeSelectors: nodeAffinity.
Node affinity
This property is an upgraded version of nodeSelector. Besides deploying the pod to the node we want, what it is better than nodeSelector is that if it cannot find the node we specify, it will deploy the pod to another node within the label's selection conditions, not Unlike nodeSelector, if it cannot be found, the pod cannot be deployed.
In addition, compared to nodeSelector which only selects exactly according to the label, nodeAffinity will allow us to select labels in a more flexible way. For example:
As you can see, when we specify nodeAffinity, it looks much more complicated than nodeSelector, but because of that it is more flexible. To use the nodeAffinity field, we need to declare the affinity field first, then to specify the label of the node, we use the nodeSelectorTerms field which is an array containing many matchExpressions, the key value with value is the value of the node label, the operator has the value. treat is In, NotIn, Exists, DoesNotExist, Gt, Lt. In the config file above, the pod will be deployed to the node whose key value is in the values array.
Above, the key value we specify is disktype, operator is In, values is an array with value ["ssd"]=> disktype in ["ssd"].

Required During Scheduling and Ignored During Execution
Did you notice that the longest field is requiredDuringSchedulingIgnoredDuringExecution ? It will have the following meaning:
requiredDuringScheduling: means that the properties below only affect the time a pod is scheduled to a node.
IgnoredDuringExecution: means it will have no effect on pods already running on that node.
For example, our pod has been deployed to a node with a label of disktype: ssd, then even if we delete the label of this node, it will not affect the pods running on it, but only affect the pods. can only be deployed later.
In the future, perhaps kubernetes will add the RequiredDuringExecution attribute, which means it will affect pods running on that node.
Prioritizing nodes when scheduling a pod
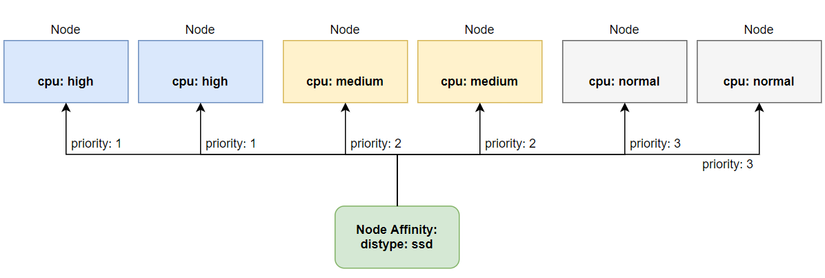
Another interesting point about node affinity is that we can prioritize deploying pods to any node first compared to the remaining nodes in the nodes we have chosen. We can do that using the preferredDuringSchedulingIgnoredDuringExecution property .
For example, we have 3 worker node clusters as follows, one cluster with this extremely powerful CPU for pods that run trading applications, one cluster with average CPU for pods that run transaction processing applications, and one normal CPU cluster for regular api web applications. Then we will prioritize deploying pod trader to a worker node cluster with an extremely powerful CPU first. If that cluster does not have enough resources, then ok, we will also accept deploying pod trader to a worker node cluster with an average CPU. We will have nodes as follows:
We label the node as follows:
The configuration file of our Deployment will be as follows:
To specify the priority, we use the weight attribute and assign a value to it. In the file above, we specify the node with the label cpu: high with a weight value of 50, this is the highest value, so the pods of We will prioritize deploying to the node labeled cpu: high first. If that node cluster does not have enough resources, it will deploy below the remaining nodes with lower priority.

You have seen how node selector and node affinity work, they will affect the pod during the scheduling process. But these rules are only related to pods and nodes. Suppose we don't want to deploy a pod to any node but just want to deploy a pod near another pod, what would we do? Kubernetes provides a way for us to do that, called pod affinity.
Pod affinity
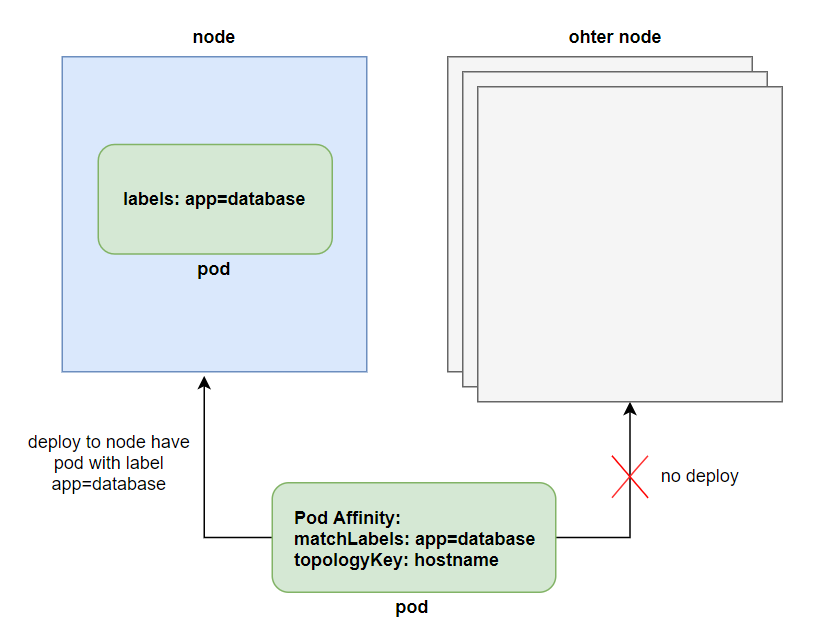
Instead of deploying pods to nodes, we will have another need to deploy pods close to another pod. For example, we have a backend pod and a database pod. We want those two pods to be deployed close to each other so that API latency is lowest.
We can do that using node affinity, but we will need to label the node and specify which nodes can be deployed to the pod, which is not a good way to solve this problem. We use node affinity to deploy pods to a specific node cluster, then we will let related pods be deployed close to each other.
For example, let's create a database pod as follows:
Then, we will create the backend pod and specify the pod affinity so that it is deployed close to the pod database.
To use the Pod Affinity function, we use the podAffinity field in the affinity field. The value requiredDuringSchedulingIgnoredDuringExecution has the same meaning as nodeAffinity, we will specify the scope of the pod using the topologyKey field, in the file above, the scope we specify is only in one node with the kubernetes.io/hostname.
When the pod that we specify podAffinity is deployed, it will look for pods that have labels in the matchLabels field, then deploy the pod to the selected pod in the same node. We can increase this scope using the topologyKey field.

topologyKey
This is an attribute that helps us indicate the scope of a pod when it is deployed close to another pod. It is often of interest when we use the cloud. If you do not use the cloud, you can skip the need to learn about this attribute. If you use the cloud, then we will be familiar with words like availability zone or region. We can use topologyKey to define a pod that will be deployed near another pod in the same node, same AZ or same region. .
We do this by labeling the node with a key of kubernetes.io/zoneor kubernetes.io/region, then we specify the topologyKey field as follows:
We have seen how pod affinity works, which will help us deploy pods as close to each other as we want. Kubernetes also provides a way to deploy a pod far away from the rest if you want, using anti-affinity pods.
Pod anti-affinity
So instead of wanting to deploy pods close to each other, we will want to deploy pods far apart. In fact, I haven't found the benefit of using this guy yet 😂. To use this function, instead of using the podAffinity field, we will use the podAntiAffinity field. For example:
In the file above, we will specify that the front-end pod will be deployed away from the backend pod with the scope being within a node, meaning that if a node contains a backend pod, the front-end pod will not be deployed to that node.
Conclude
So we have finished learning about the properties we can use in advanced scheduling. When we need to deploy a pod to a certain node cluster, we will use node affinity, when we need to deploy a pod close to another pod, we will use pod affinity, and if far away, we use pod anti-affinity
Last updated