# StatefulSets
> Stateless application is an application that does not store its own state, or does not store data but needs persistent storage. For example, a web server API that does not store images, or user login sessions, is a stateless app, because no matter how many times we delete our app and recreate it, it will not affect the application. affect user data. Because our data is stored through the database, the web server API only connects to the database and stores data, but it does not have its own data. Another example is the command line app, it does not need to store any data, all it needs is to output the results and does not need to save the results. The features of a stateless app will make it easier to scale.
> A stateful application requires its own state, and needs to save that state, or requires data storage that requires persistent storage, which will be used by the client and other applications. For example, if it is a database, it will have its own data.
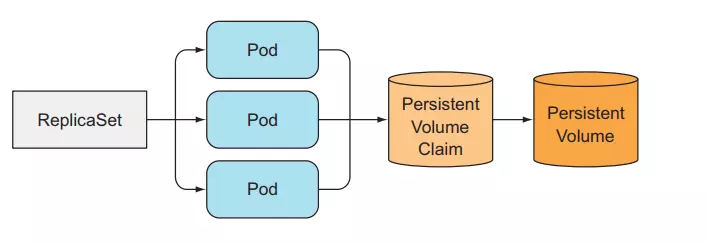
In Kubernetes we can deploy a stateful application by creating a Pod and configuring the volume for the Pod, or using PersistentVolumeClaim. But we can only create a single instance of Pod that connects to that PersistentVolumeClaim. So can ReplicaSet be used to create replicated stateful apps? What we want is to create many replicas of the Pod, and for each Pod we will use a separate PersistentVolumeClaim, to run a distributed data store application.
### Limitations of using ReplicaSet to create replicated stateful apps
Because ReplicaSet creates multiple pod replicas from a Pod template, those replicated Pods are no different from other Pods except for name and IP. If we configure the volume in the Pod template, all replicated Pods will store data in the same storage.
So we cannot use a ReplicaSet and set its replicas property to run a distributed data store application. We need to use another method.
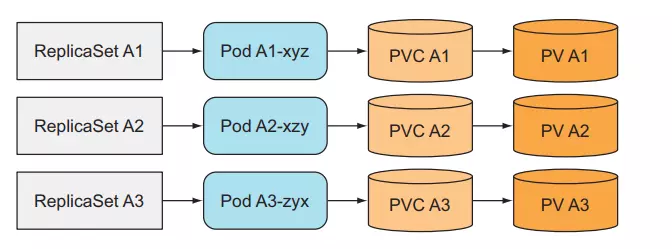
#### Create multiple ReplicaSets with only one Pod per ReplicaSet
We create many ReplicaSets and each ReplicaSet will have a different Pod template.
We can use this method to deploy a distributed data store application. But this is not a good way. For example, if we want to scale our application, how do we do it? The only way is to create another ReplicaSet manually, this job is not automatic at all. We chose kubernetes to run the application because we wanted everything like scaling to be automatic and easiest.
#### Provide stable identity for each Pod
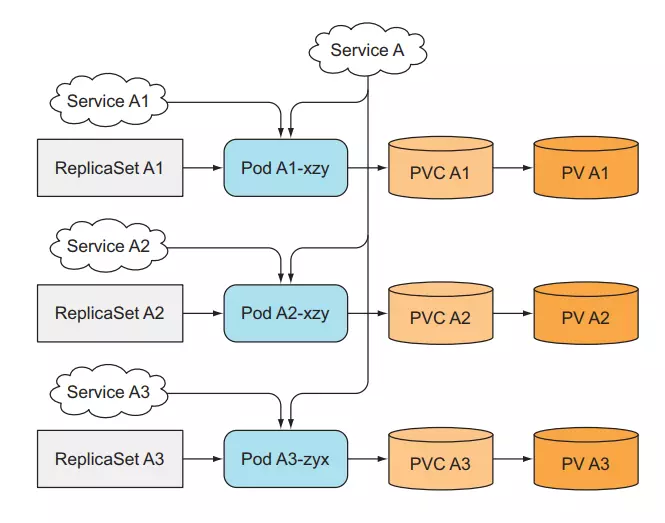
For a statefull application, we need to identify each Pod, because Pods can be deleted and recreated at any time. When ReplicaSet replaces an old Pod with a new Pod, the newly created Pod will have a different name and different IP. . Even though our data is still there and is the same as the old Pod, for some applications, when we create a new Pod and it has a new network identity (such as an IP address), it will create many problems. So we need to use Service to identify IP for Pod, no matter how many ReplicaSets we have, we will need to create that many corresponding Services.
When we have more Services, now we want to scale up. Besides having to create a new ReplicaSet, we now need to create a new Service for the corresponding ReplicaSet, doubling the work that has to be done by hand.
So to solve the above problems, we can easily create multiple replicates of the Pod, each one will have its own identifier, and can easily scale automatically without having to do too much by hand, making it easier for us to creating a distributed data store application. Kubernetes provides us with a resource called StatefulSet.
### StatefulSets
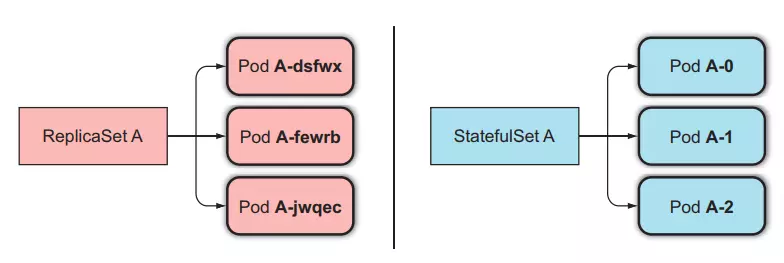
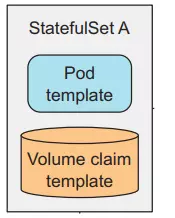
Like ReplicaSet, StatefulSet is a resource that helps us run multiple Pods with the same template by setting the replicas property, but different from ReplicaSet in that StatefulSet's Pods will be accurately identified and each will have a stable network identity. its own.
Each Pod created by StatefulSet will be assigned an index, which will be used to identify each Pod. And the name of the Pod will be set in style `-`, not random like ReplicaSet.
#### How StatefulSets replace a lost Pod
When a Pod managed by a StatefulSets is lost (due to being deleted by someone), the StatefulSets will create a new Pod to replace the old one similar to the ReplicaSet method, but the newly created Pod will has the same name and hostname as the old guy.
As for ReplicaSet, it will create a new Pod that is completely different from the old one.
#### Cách StatefulSets scale Pod
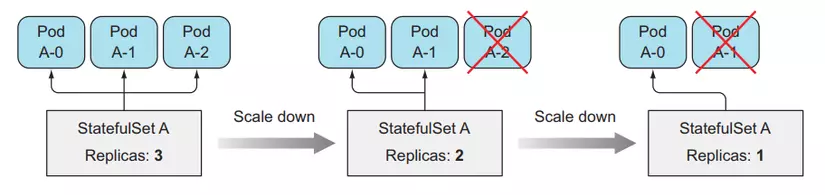
When we scale up a Pod in StatefulSets, it will create a new Pod indexed as the next number of the current index. For example, StatefulSets currently has replicas of 2, there will be 2 Pods of `-0`, `-1`, when we scale up the Pod to 3, the newly created Pod will be named `-2`.
Similarly with scale down, it will delete the Pod with the largest index. For StatefulSets, when we scale up and scale down, we can know the exact name of the Pod that will be created or deleted.
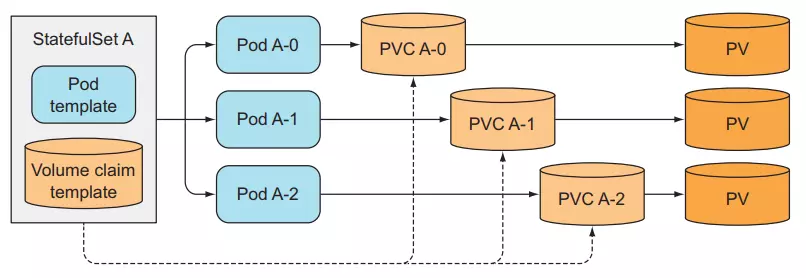
#### Provide separate storage for each Pod
At this point, we know how StatefulSets identifies each Pod, so what about storage? Each of our Pods needs to have its own storage, and when we scale down the number of Pods and scale them up again, the created Pod that has the same index as the old one will still retain its storage as if we did not have to create a new Pod. another storage guy.
StatefulSets does that by separating storage from Pods using [PersistentVolumeClaims](https://viblo.asia/p/kubernetes-series-bai-7-persistentvolumeclaims-tach-pod-ra-khoi-kien-truc-storage-ben-duoi-6J3Zgyeq5mB) that we talked about in lesson 7. StatefulSets will create PersistentVolumeClaims for each Pod and attach it to each corresponding Pod.
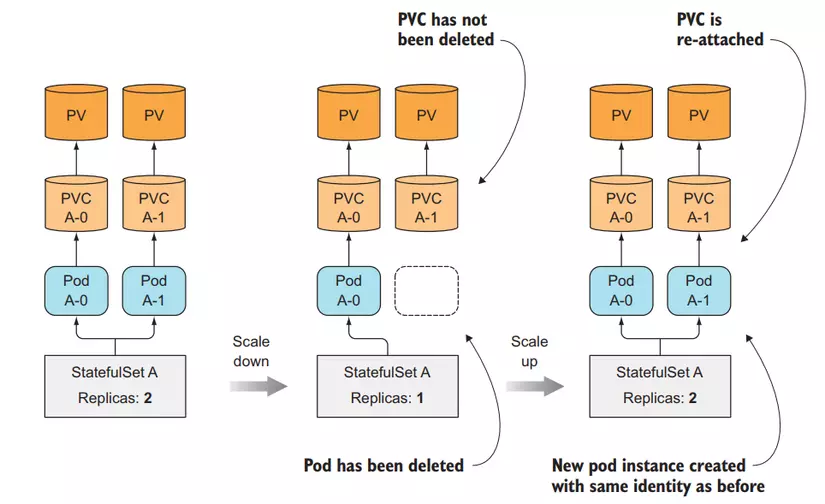
When we scale up a Pod in StatefulSets, there will be a new Pod and a new PersistentVolumeClaims created, but when we scale down, only the Pod is deleted, the PersistentVolumeClaims is still there and not deleted. So that when we scale up again, the Pod will still be properly attached to the previous PersistentVolumeClaims so its data will remain the same.
#### Create a StatefulSets
Now we will try to create a StatefulSets. Create a file named kubia-statefulset.yaml with image **luksa/kubia-pet** , the image code is as follows:
```javascript
const http = require('http');
const os = require('os');
const fs = require('fs');
const dataFile = "/var/data/kubia.txt";
function fileExists(file) {
try {
fs.statSync(file);
return true;
} catch (e) {
return false;
}
}
var handler = function(request, response) {
if (request.method == 'POST') {
var file = fs.createWriteStream(dataFile);
file.on('open', function (fd) {
request.pipe(file);
console.log("New data has been received and stored.");
response.writeHead(200);
response.end("Data stored on pod " + os.hostname() + "\n");
});
} else {
var data = fileExists(dataFile) ? fs.readFileSync(dataFile, 'utf8') : "No data posted yet";
response.writeHead(200);
response.write("You've hit " + os.hostname() + "\n");
response.end("Data stored on this pod: " + data + "\n");
}
};
var www = http.createServer(handler);
www.listen(8080);
```
Config of kubia-statefulset.yaml file:
```yaml
apiVersion: v1
kind: Service
metadata:
name: kubia
spec:
clusterIP: None
selector:
app: kubia
ports:
- name: http
port: 80
---
apiVersion: apps/v1
kind: StatefulSet
metadata:
name: kubia
spec:
serviceName: kubia # the name of service
replicas: 2
template: # pod template
metadata:
labels:
app: kubia
spec:
containers:
- name: kubia
image: luksa/kubia-pet
ports:
- name: http
containerPort: 8080
volumeMounts:
- name: data
mountPath: /var/data
volumeClaimTemplates: # pvc template
- metadata:
name: data
spec:
resources:
requests:
storage: 1Mi
accessModes:
- ReadWriteOnce
```
In this config file we will have a Headless Service and a StatefulSet named kubia. In the config of StatefulSet, we must specify the service name used to identify the network for the Pod, Pod template, and PersistentVolumeClaims template. The difference with ReplicaSet's config is that we need to declare additional templates for PersistentVolumeClaims, StatefulSet will use it to create separate PVCs for each Pod.
Create StatefulSet:
```none
$ kubectl create -f kubia-statefulset.yaml
service "kubia" created
statefulset "kubia" created
```
Now let's list the Pod to see:
```none
$ kubectl get po
NAME READY STATUS RESTARTS AGE
kubia-0 1/1 Running 0 8s
kubia-1 0/1 ContainerCreating 0 2s
```
We see that the Pod we created will have a name assigned to the index, now let's list the PVCs to see:
```none
$ kubectl get pvc
NAME STATUS VOLUME CAPACITY ACCESSMODES AGE
data-kubia-0 Bound pv-0 0 37s
data-kubia-1 Bound pv-1 0 37s
```
The name of PersistentVolumeClaims will be named according to the name we specify in the volumeClaimTemplate section and connected to the index. Here we have seen that each of our Pods will have its own identifier and use its own PVCs. Exactly what we need when building a distributed storage system.
#### Interact with the Pod using its identifier
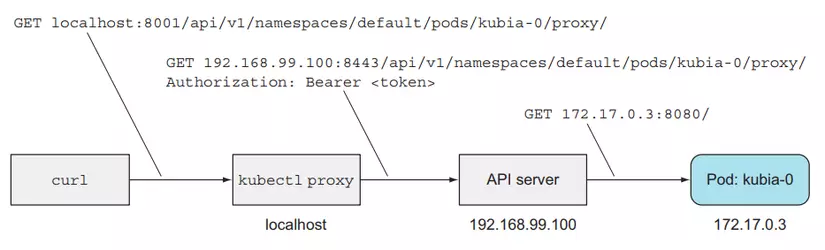
Now we will try to interact with each individual Pod. First we use the proxy command:
```none
$ kubectl proxy
Starting to serve on 127.0.0.1:8001
```
Open another terminal:
```none
$ curl localhost:8001/api/v1/namespaces/default/pods/kubia-0/proxy/
You've hit kubia-0
Data stored on this pod: No data posted yet
$ curl -X POST -d "Hey there! This greeting was submitted to kubia-0." localhost:8001/api/v1/namespaces/default/pods/kubia-0/proxy/
Data stored on pod kubia-0
$ curl localhost:8001/api/v1/namespaces/default/pods/kubia-0/proxy/
You've hit kubia-0
Data stored on this pod: Hey there! This greeting was submitted to kubia-0.
```
The printed result is that we have connected to Pod kubia-0.
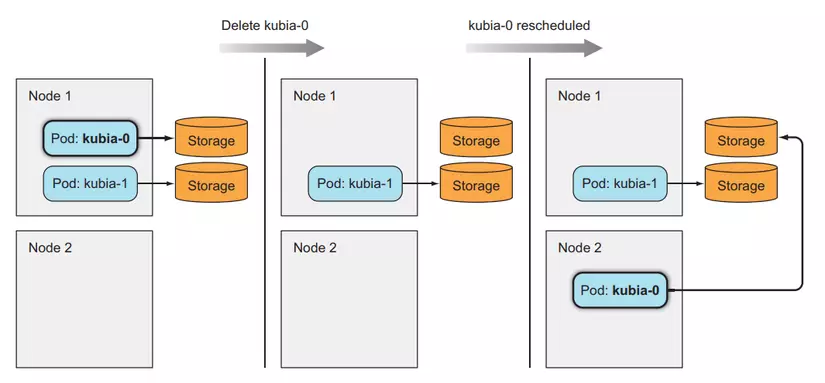
Now we delete the Pod to check whether the newly created Pod uses the old PVCs correctly or not.
```none
$ kubectl delete po kubia-0
pod "kubia-0" deleted
```
List Pod to see how it is deleted and recreated.
```none
$ kubectl get po
NAME READY STATUS RESTARTS AGE
kubia-0 1/1 Terminating 0 3m
kubia-1 1/1 Running 0 3m
$ kubectl get po
NAME READY STATUS RESTARTS AGE
kubia-0 0/1 ContainerCreating 0 6s
kubia-1 1/1 Running 0 4m
$ kubectl get po
NAME READY STATUS RESTARTS AGE
kubia-0 1/1 Running 0 9s
kubia-1 1/1 Running 0 4m
```
We see that here the new Pod we create will have the same identifier as the old Pod, that's what we want, now let's try to see if our previous data still has the same name in Pod kubia-0.
```none
$ curl localhost:8001/api/v1/namespaces/default/pods/kubia-0/proxy/
You've hit kubia-0
Data stored on this pod: Hey there! This greeting was submitted to kubia-0.
```
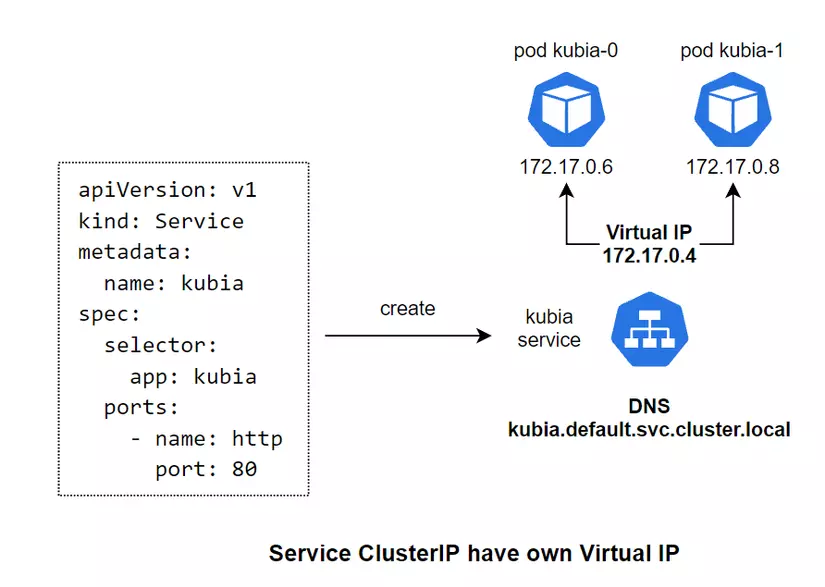
Our data is still here, exactly what we want. As you can see, using StatefulSet will create identified Pods and have identified PVCs. So what about the network? That means how will we access each specific Pod if we do not use a proxy? In the previous articles, we used Service to interact with the Pod, and as a Service, its request will be randomly sent to the Pods behind, not exactly one Pod, we want to be able to request to exactly one Pod.
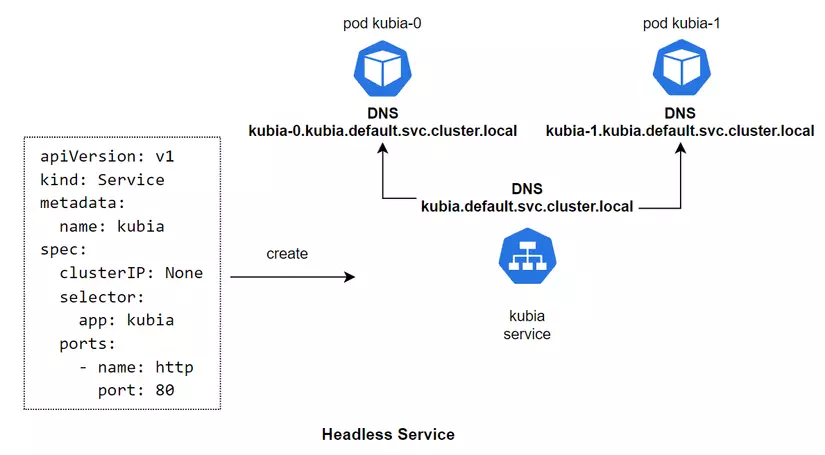
Here we will use a technique called Headless Service, as you can see in the config file above we have created a service and specified **its clusterIP attribute as None** . This is how we will create a Headless Service and identify addresses for each Pod.
#### Headless Service
For a normal ClusterIP Service, when we create that Service, it will create a Virtual IP for itself and a corresponding DNS for that VIP, and this VIP will map with the Pods behind the Service.
As for the Headless Service, when declaring the config we will specify the **clusterIP: None** attribute for it. When we create a Headless Service, it will not create a Virtual IP for itself, but only create a DNS. Then, it will create DNS for each Pod behind it, and map the DNS to the DNS lines of the Pod behind it. For example, kubia-0 will have the corresponding DNS as **kubia-0.kubia.default.svc.cluster.local** .
And we can directly access the Pod inside the cluster by calling DNS **kubia-0.kubia** and **kubia-1.kubia** if accessing the same namespace. Or use DNS **kubia-0.kubia.default.svc.cluster.local** and **kubia-1.kubia.default.svc.cluster.local** if accessing a different namespace.
Headless Service allows us to access a certain Pod directly using DNS, instead of accessing through the Service's DNS and then our request will be directed to a random Pod. We combine Headless Service with StatefulSet to give Pods a stable network identity, and because each Pod has its own index identifier, we can know exactly which Pod we need to call.
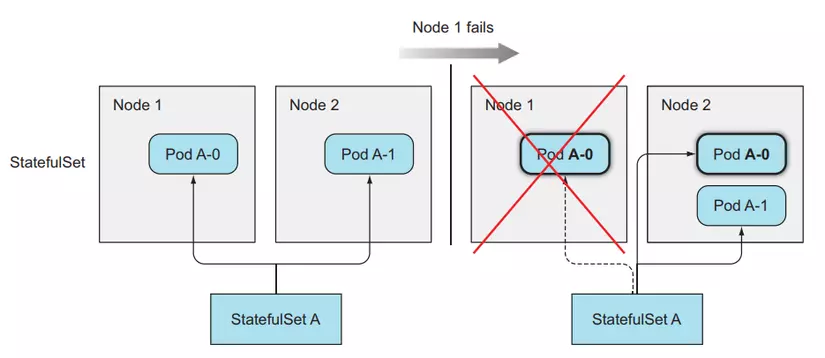
### How StatefulSet works with node failures
Unlike ReplicaSet, StatefulSet will ensure that Pods with the same identifier are never created, so when a node fails. StatefulSet will not create a new Pod before making sure the old one is gone.
#### How Pods are removed when node fails
When a node fails, the Pods on that node will have a status of Unknown. If after a while the node does not revive, the Pod on that node will be removed, its status will be updated to Terminate.
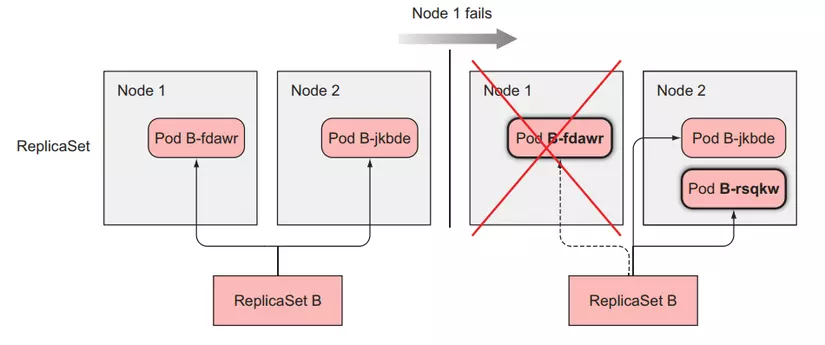
For ReplicaSet, because its managed Pods do not have identifiers, the Pod names will not overlap, so when one of its Pods has a status of Terminate, it will create a new one, and when the new one is created After that, regardless of whether the old person is terminated or not, it will be deleted from the cluster.
As for StatefulSet, because Pod has an identifier, when a new Pod is created it will have the same name as the old Pod, so when a Pod is located on a failed node and has a status of Terminated, StatefulSet will still not create a new Pod until it is sure. Apparently the Pod has been completely deleted. But because our node has died, it cannot report back to the kubernetes master whether the Pod has been successfully deleted or not, so the Pod will remain in Terminate state forever, at this point we need to delete the Pod. go by hand.
#### Simulate a node dying
Now we will look at an example to make it easier to understand. In this example we will have 3 VMs located on GCP, we will ssh into one and simulate that VM dying:
```none
$ gcloud compute ssh gke-kubia-default-pool-32a2cac8-m0g1
$ sudo ifconfig eth0 down
```
Now we check the status of 3 workers:
```none
$ kubectl get node
NAME STATUS AGE VERSION
gke-kubia-default-pool-32a2cac8-596v Ready 16m v1.6.2
gke-kubia-default-pool-32a2cac8-m0g1 NotReady 16m v1.6.2
gke-kubia-default-pool-32a2cac8-sgl7 Ready 16m v1.6.2
```
We will see a node changing the status to NotReady. Now let's list the pods to try:
```none
$ kubectl get po
NAME READY STATUS RESTARTS AGE
kubia-0 1/1 Unknown 0 15m
kubia-1 1/1 Running 0 14m
kubia-2 1/1 Running 0 13m
```
As you can see, Pod's status is now Unknown. After a few minutes when we describe the pod, we will see the Pod's status change to Terminated.
```none
$ kubectl describe po kubia-0
Name: kubia-0
Namespace: default
Node: gke-kubia-default-pool-32a2cac8-m0g1/10.132.0.2
...
Status: Terminating (expires Tue, 23 May 2017 15:06:09 +0200)
Reason: NodeLost
Message: Node gke-kubia-default-pool-32a2cac8-m0g1 which was running pod kubia-0 is unresponsive
```
Now, in order for the Pod to be replaced, we must delete the Pod manually, but because our node is dead, the normal delete command will not run, we need to use:
```none
$ kubectl delete po kubia-0 --force --grace-period 0
```
Then, when we list the pods, we will see that a new pod will be created:
```none
$ kubectl get po
NAME READY STATUS RESTARTS AGE
kubia-0 1/1 ContainerCreating 0 21m
kubia-1 1/1 Running 0 20m
kubia-2 1/1 Running 0 19m
```
---
# Agent Instructions: Querying This Documentation
If you need additional information that is not directly available in this page, you can query the documentation dynamically by asking a question.
Perform an HTTP GET request on the current page URL with the `ask` query parameter:
```
GET https://huy312100.gitbook.io/software-development/devops/kubernetes/statefulsets.md?ask=
```
The question should be specific, self-contained, and written in natural language.
The response will contain a direct answer to the question and relevant excerpts and sources from the documentation.
Use this mechanism when the answer is not explicitly present in the current page, you need clarification or additional context, or you want to retrieve related documentation sections.